
- To install WSL2 on Windows 10, open Command Prompt as admin and run “wsl –install.”
- The command will install all the WSL2 components and the Ubuntu Linux distro.
- To install a specific distro, run “wsl –install -d DISTRO-NAME.”
- To update the WSL2 kernel, run the “wsl –update” command.
WSL2 (Windows Subsystem for Linux version 2) is a new version of the architecture that allows you to use Linux on top of Windows 10 natively (using a lightweight virtual machine) and replaces WSL.
The feature runs an actual Linux kernel in a virtual machine, which improves performance and app compatibility over the previous version while maintaining the same experience as the first release.
This guide will teach you the steps to install the Windows Subsystem for Linux 2 on Windows 10.
Install WSL2 on Windows 10
Microsoft has simplified the installation process of the WSL on Windows 10 to only one command that downloads and installs all the required components, including the virtual machine platform and Ubuntu Linux by default.
To install Windows Subsystem for Linux on Windows 10, use these steps:
-
Open Start on Windows 10.
-
Search for Command Prompt, right-click the top result, and select the Run as administrator option.
-
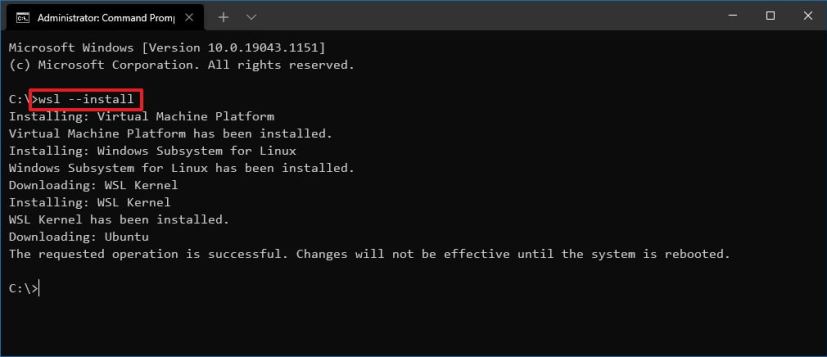
Type the following command to install the WSL on Windows 10 and press Enter:
wsl --install
-
Restart your computer to finish the WSL installation on Windows 10.
-
Continue with the Linux distro setup as necessary.
Once you complete the steps, the required Linux components will automatically install the latest version of the Ubuntu Linux distribution.
Install WSL with specific distro
To install WSL with a specific distro on Windows 10, use these steps:
-
Open Start.
-
Search for Command Prompt, right-click the top result, and select the Run as administrator option.
-
Type the following command to view a list of available WSL distros to install on Windows 10 and press Enter:
wsl --list --online
Quick note: At the time of this writing, you can install Ubuntu, Debian, Kali Linux, openSUSE, and SUSE Linux Enterprise Server. -
Type the following command to install the WSL with a specific distro on Windows 10 and press Enter:
wsl --install -d DISTRO-NAME
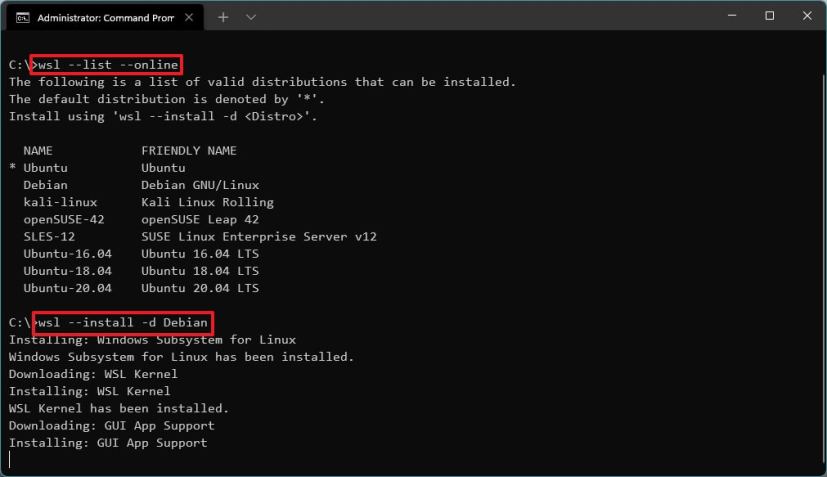
Remember to replace “DISTRO-NAME” in the command with the distro’s name to install, such as Debian.
-
Restart your computer.
-
Continue with the Linux distro setup as necessary.
After you complete the steps, the Windows Subsystem for Linux 2 components will install with the distro of Linux you specified.
Update WSL kernel
To update the WSL kernel to the latest version on Windows 10, use these steps:
-
Open Start.
-
Search for Command Prompt, right-click the top result, and select the Run as administrator option.
-
Type the following command to update the WSL kernel and press Enter:
wsl --update

Once you complete the steps, if an update is available, it will download and install on the device.
If the update command doesn’t work, open Settings > Update & Security > Windows Update > Advanced options, and turn on the “Receive updates for other Microsoft products when you update Windows” toggle switch.
Install WSL2 on Windows 10 (older versions)
Alternatively, you can still install WSL on Windows 10 version 1909 and older versions using the legacy processes. The process requires enabling WSL1, the Virtual Machine Platform, converting existing distros (if applicable), and configuring the Windows Subsystem for Linux 2 as the new default for future distro installations.
If you have an ARM64 system, the Linux integration is supported on version 2004 and higher.
Enable Windows Subsystem for Linux
If you are not already using Linux on Windows 10, you must enable the Windows Subsystem for Linux (version 1) with these steps:
-
Open Start on Windows 10.
-
Search for Turn Windows features on or off and click the top result to open the app.
-
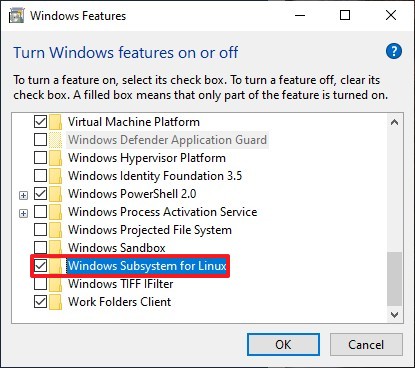
Check the “Windows Subsystem for Linux” option.
-
Click the OK button.
-
Click the Restart button.
Once you complete the steps, you must enable the Virtual Machine Platform feature.
Enable Virtual Machine Platform
To enable the Virtual Machine Platform on Windows 10, use these steps:
-
Open Start.
-
Search for PowerShell, right-click the top result, and select the Run as administrator option.
-
Type the following command to enable the Virtual Machine Platform feature and press Enter:
Enable-WindowsOptionalFeature -Online -FeatureName VirtualMachinePlatform

-
Restart your computer.
After you complete the steps, you can set the Windows Subsystem for Linux version 2 as the new default architecture and convert existing distros.
Enable Windows Subsystem for Linux 2
To start using WSL2 or covert WSL distros to WSL2, use these steps:
-
Download this WSL 2 kernel update (required).
-
Double-click the wsl_update_x64.msi file and apply the update.
-
Open Start.
-
Search for PowerShell, right-click the top result, and select the Run as administrator option.
-
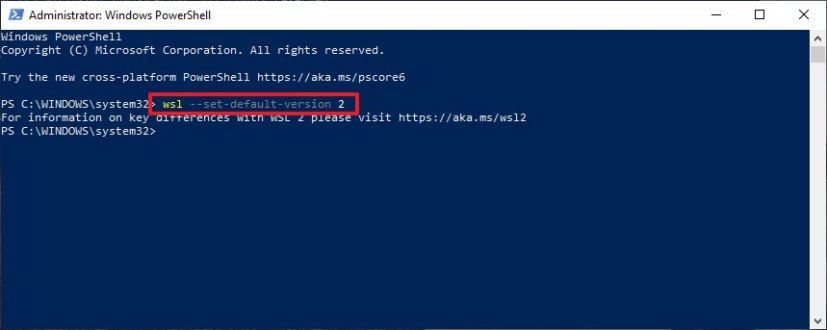
Type the following command to set Windows Subsystem for Linux 2 your default architecture for new distros that you install, and press Enter:
wsl --set-default-version 2
-
(Optional) Type the following command to convert the distro from WSL to WSL 2 and press Enter:
wsl --set-version Ubuntu 2
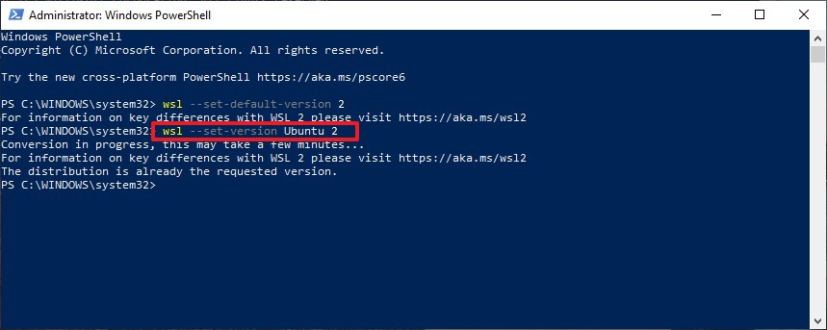
In the command, change “Ubuntu” for the distro’s name you want to convert. If you do not know the distro’s name, use the
wsl -l -vcommand.
Once you complete the steps, your device will start using the new version of Windows Subsystem for Linux as the default architecture. (See video tutorial on the Pureinfotech YouTube channel.)
Confirm distro platform
To confirm distros are using the Windows Subsystem for Linux 2, use these steps:
-
Open Start.
-
Search for PowerShell, right-click the top result, and select the Run as administrator option.
-
Type the following command to verify the version of the distro and press Enter:
wsl --list --verbose
-
Confirm the distro version is 2.

After you complete the steps, you will know if the process was successful or if you need to troubleshoot any of the steps.
