On Windows 10, ForFiles is a useful command-line tool designed to select files using different criteria and then run a command on them. Typically, this command is more commonly use to delete a group of files that meet certain criteria. For example, files that have not been modified in a specific number of days.
The only caveat with ForFiles is that it only runs locally, meaning that you cannot use it to select and execute commands on files stored in a network folder. However, it is possible to complete this task if you map the network folder on Windows 10 and then run the command in the mapped drive. You can even create a script to schedule a task to run the command automatically.
In this guide, you will learn the steps to use the ForFiles command on a shared network folder on Windows 10.
- How to use ForFiles command on network folder on Windows 10
- How to schedule ForFiles command on network folder on Windows 10
How to use ForFiles command on network folder on Windows 10
To delete files on a network shared folder with ForFiles, use these steps:
-
Open Start on Windows 10.
-
Search for Command Prompt, right-click the result and select the Run as administrator option.
-
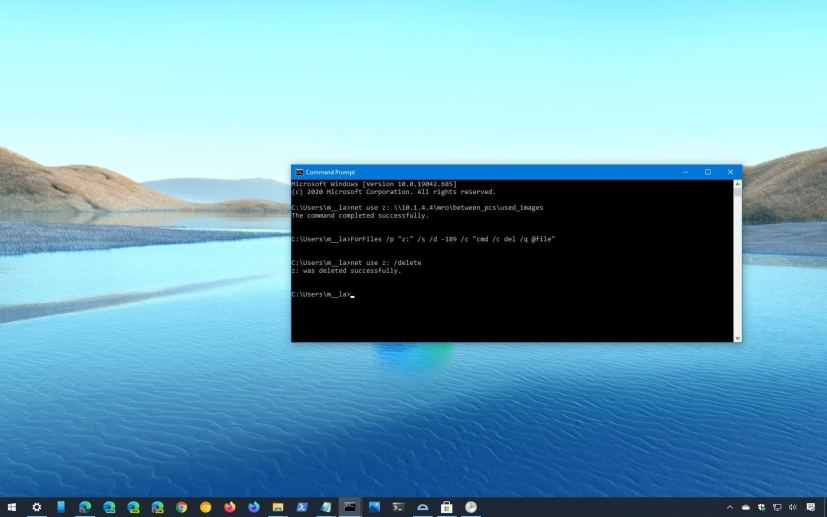
Type the following command to map the network folder you want to run the ForFiles command and press Enter:
net use z: \\networkShare\files /user:userName PaZZw0rd
In the command, change “z” for the drive letter you want to assign to the mapping and replace “\\networkShare\files” for the shared folder path.
Quick tip: The username and password are optional depending on the folder sharing permissions. -
Type the following command to remove files that have not been changed in the last 30 days and press Enter:
ForFiles /p "C:\PATH\TO\FOLDER" /s /d -30 /c "cmd /c del /q @file"
In the command, change “C:\PATH\TO\FOLDER” for the path to the folder that you want to delete files, and change /d -30 to select files with a last modified date.
ForFiles delete files network folder -
Type the following command to remove the network folder mapping and press Enter:
net use z: /delete
In the command, replace “z” for drive letter that corresponds to your mapping.
Once you complete the steps, the command will run in the network location you specified.
ForFiles options breakdown
Here are the descriptions of the options used with the ForFiles command in this guide:
- /p — indicates the pathname to start searching.
- /s — instructs ForFiles to search inside subdirectories.
- /d — specifies the last modified date for a file.
- /c — instructs ForFiles to execute command, which needs to be wrapped in double-quotes, the default is “cmd /c del @file”.
- /q — allows to delete folders without requiring confirmation.
If you want to learn more about these switches, use the ForFiles /? Command.
How to schedule ForFiles command on network folder on Windows 10
If you want to automate the process of deleting files with ForFiles, you first need to create a script and then execute it with a scheduled task using the Task Scheduler.
To delete files on a network shared folder automatically, use these steps:
-
Open Start.
-
Search for Notepad and click the top result to open the app.
-
Copy and paste the following code in the text file:
net use z: \\PATH\TO\NETWORK\FOLDER
ForFiles /p "z:" /s /d -30 /c "cmd /c del /q @file"
net use z: /delete
-
Customize the script to your preferences. For example, in the first line, make sure to change the “z” for the drive letter you want to use to map the shared folder and specify the path of the network folder you want to map to delete files. In the second line, change “z” for the drive letter that correspond to map drive, and change /d -30 to select files with a last modified date. Finally, in the third line, replace “z” with the drive letter of the network map drive.
-
Click the File menu.
-
Select the Save as option.
-
Save the file with a descriptive name and .bat extension. For example, pictures-cleanup.bat.
-
Open Start.
-
Search for Task Scheduler and click the top result to open the app.
-
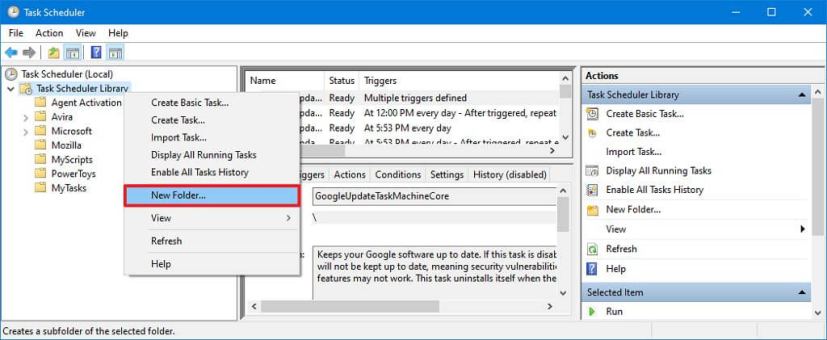
Right-click the Task Scheduler Library folder and click the New Folder option.
Task Scheduler create new folder -
Confirm a name for the folder and click the OK button. (We are creating a new folder to keep tasks organized and separated from the system tasks.)
-
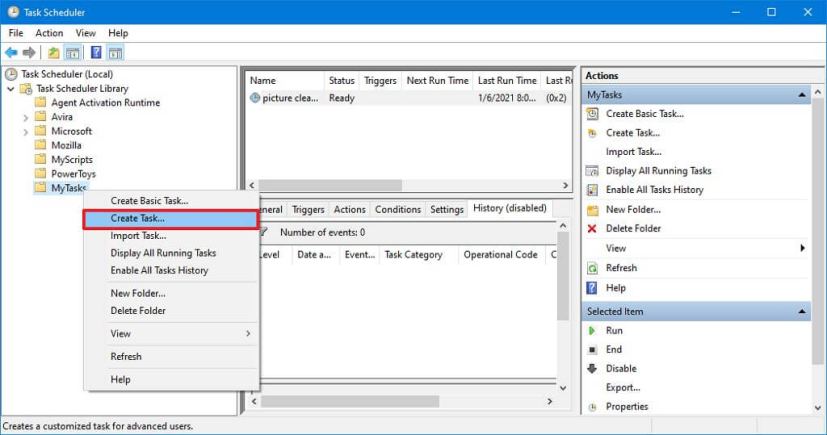
Right-click the recently created folder and select the Create Task option.
Task Scheduler create new task -
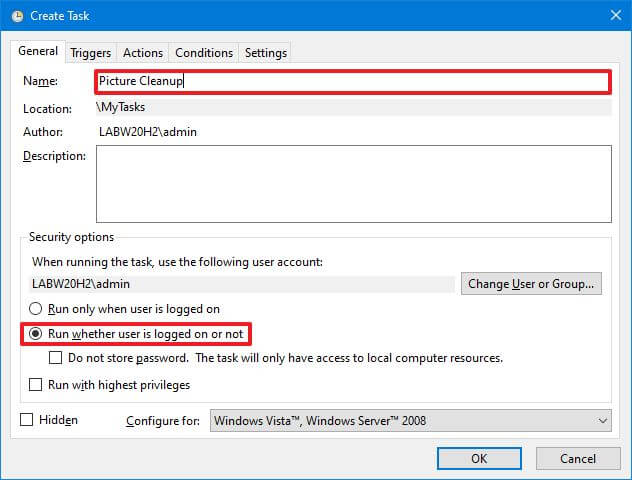
In the “Name” box, enter a name for the task. For example, Picture Cleanup
Task Scheduler general settings -
In the “General” tab, under the “Security options” section, select the Run whether user is logged on or not option. (This is the option that will make the command window not to appear when the task runs automatically.)
-
Clear the Do not store password option.
-
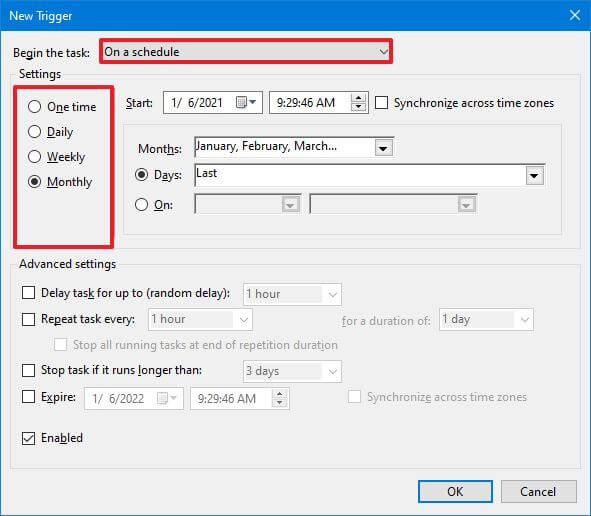
Click the “Triggers” tab and click the New button.
-
Using the “Begin the task” drop-down menu, select the On a schedule option.
-
Under “Settings,” specify when you want the task to run (for example, On time, Daily, Weekly, Monthly). For the option you select, make sure to specify the Start settings on the right side.
Schedule ForFiles task -
Click the OK button.
-
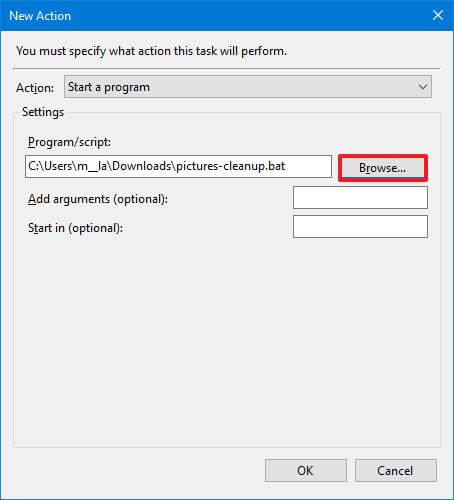
Click the “Actions” tab and click the New Button.
-
Using the “Actions” drop-down menu, select the Start a program option.
-
In the “Program/script” box, click the Browse button and locate the ForFiles script file.
Task Scheduler ForFiles script location -
Click the OK button.
-
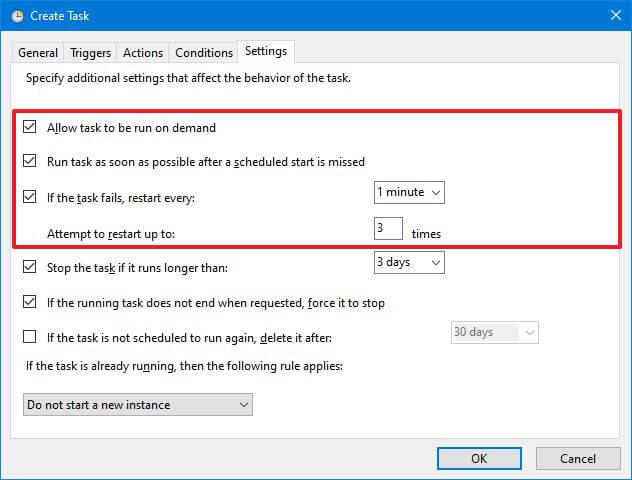
Click the “Settings” tab, and make sure to check the following options:
- Allow task to be run on demand.
- Run task as soon as possible after a scheduled start is missed.
- If the task fails, restart every.
Task Scheduler task settings -
Click the OK button.
After you complete the steps, the task will run on the schedule to remove the files in the network location that are older than the number of days you specified.
This guide is focus on deleting files that meet certain criteria from a network folder, but this is an example. You can use ForFiles to run many other commands.
Mauro Huculak is a Windows expert and the Editor-in-Chief who started Pureinfotech in 2010 as an independent online publication. He is also been a Windows Central contributor for nearly a decade. Mauro has over 12 years of experience writing comprehensive guides and creating professional videos about Windows, software, and related technologies, including Android and Linux. Before becoming a technology writer, he was an IT administrator for seven years. In total, Mauro has over 20 years of combined experience in technology. Throughout his career, he achieved different professional certifications from Microsoft (MSCA), Cisco (CCNP), VMware (VCP), and CompTIA (A+ and Network+), and he has been recognized as a Microsoft MVP for many years. You can follow him on X (Twitter), YouTube, LinkedIn and About.me.