
- To create a local administrator account on Windows 11, open Settings > Accounts > Other users.
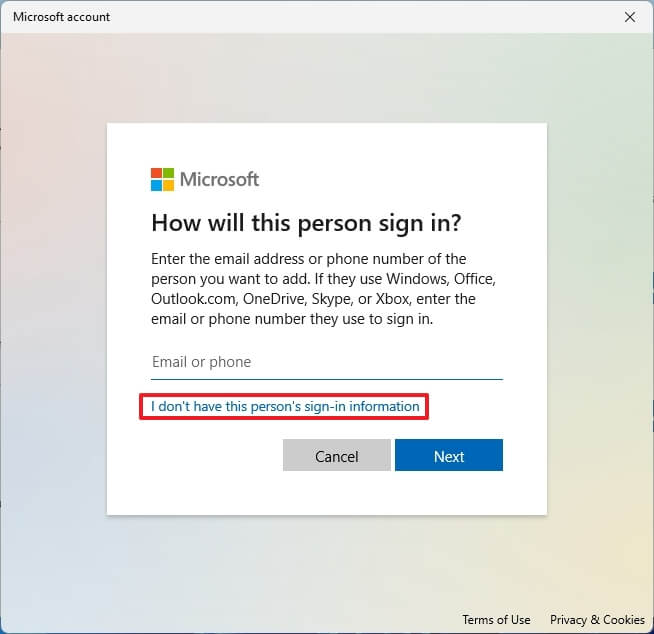
- Click the “Add account” button and select the “I don’t have this person’s sign-in information” option.
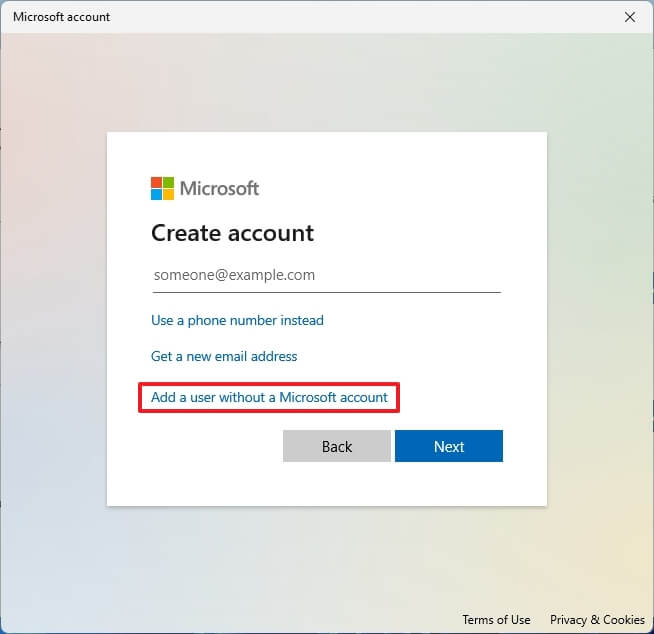
- Click the “Add a user without a Microsoft account” option to create an administrator account.
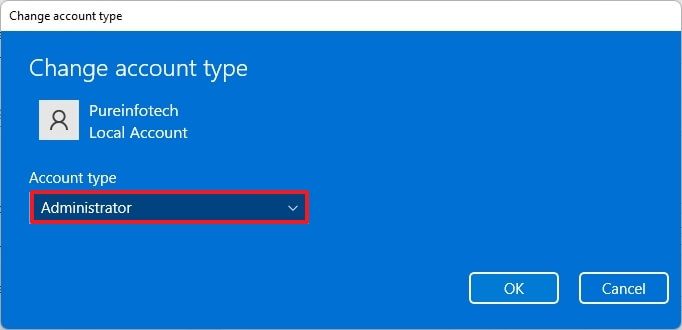
- Select the local account, click the “Change account type” button, and choose the “Administrator” option.
- You can also use Computer Management, Command Prompt, and PowerShell to create a local admin account.
On Windows 11, a local administrator account gives the user full access to the device, allowing them to change personal and system settings, install applications, and manage other users.
The only caveat is that when you create a new local account, Windows 11 sets it up as a “Standard” account that is very limited to essential tasks. A user with this type of account can only change some personalization settings and run apps, and they can’t change system settings, install or uninstall apps, or manage other users. However, you can still create an administrator account. You only need to perform a few extra steps, depending on whether you have Windows 11 22H2 or 21H2.
This guide will teach you different approaches to creating an administrator Windows 11 account through Settings, Command Prompt, and PowerShell.
- Create local administrator account on Windows 11 22H2
- Create local administrator account on Windows 11 21H2
- Create local administrator account from Command Prompt on Windows 11
- Create local administrator account from PowerShell on Windows 11
Create local administrator account on Windows 11 22H2
To create a local administrator account on Windows 11 22H2, use these steps:
-
Open Start on Windows 11.
-
Search for Settings and click the top result to open the app.
-
Click on Accounts.
-
Click the Other users tab.
-
Under the “Other users” section, click the Add account button.

-
Click the “I don’t have this person’s sign-in information” option.
-
Click the “Add a user without a Microsoft account” option.
-
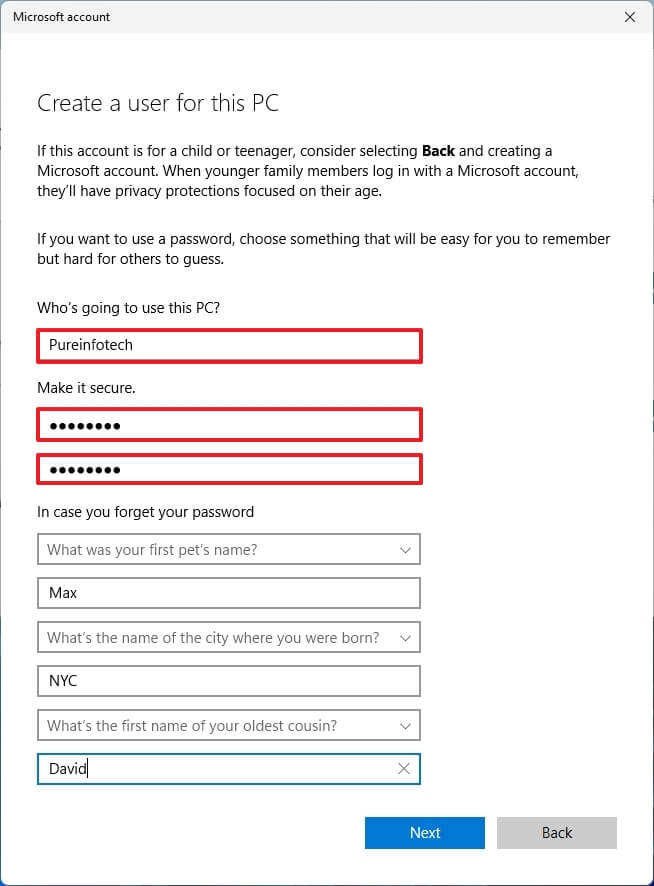
Create a Windows 11 administrator account by confirming a name and password.
-
Configure the security questions to recover the account if the password is lost.
-
Click the Next button.
-
Select the newly created account and click the “Change account type” button.

-
Use the “Account type” drop-down menu and select the Administrator option.
-
Click the OK button.
After you complete the steps, the new account will be created on Windows 11 22H2.
Enable default Administrator account
If you have to enable the default “Administrator” account instead, use these steps:
-
Open Start.
-
Search for Computer Management and click the top result to open the app.
-
Expand Local Users and Groups on the left pane.
-
Select the Users item.
-
Right-click the Administrator user on the right side and select the Properties option.

-
Clear the “Account is a disabled” option.

-
Click the Apply button.
-
Click the OK button.
After you complete the steps, the built-in Administrator account will enable on the computer.
Create local administrator account on Windows 11 21H2
To create an administrator local account on Windows 11 21H2, use these steps:
-
Open Settings.
-
Click on Accounts.
-
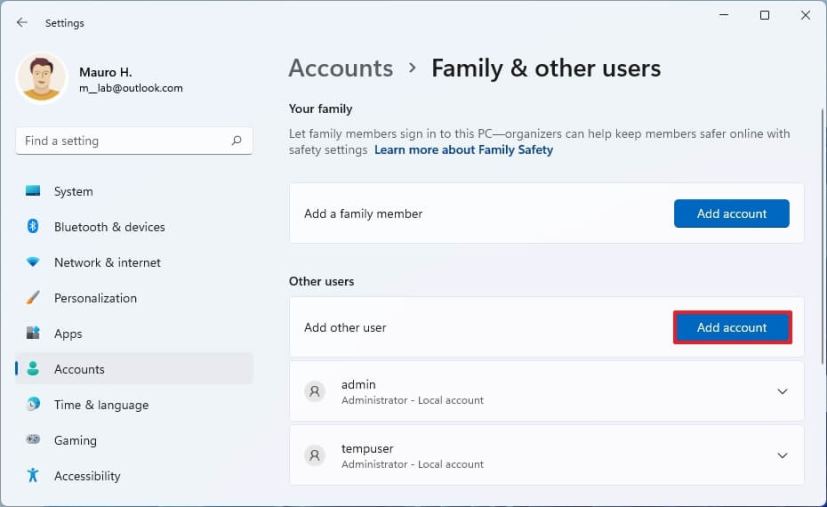
Click the Family & other users tab.
-
Under the “Other users” section, click the Add account button.
-
Click the “I don’t have this person’s sign-in information” option.

-
Click the “Add a user without a Microsoft account” option.

-
Create a Windows 11 administrator account by confirming a name and password.

-
Configure the security questions to recover the account if the password is lost.
-
Click the Next button.
-
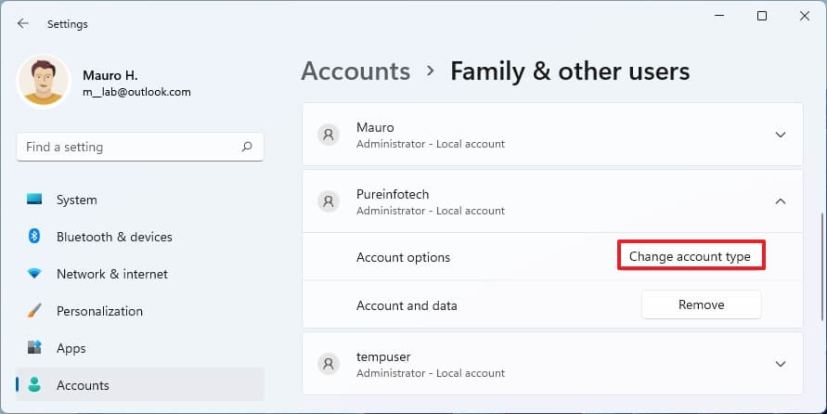
Select the newly created account and click the “Change account type” button.
-
Use the “Account type” drop-down menu and select the Administrator option.

-
Click the OK button.
Once you complete the steps, the new account will appear on Windows 11 21H2.
Create local administrator account from Command Prompt on Windows 11
To create a local administrator account from Command Prompt, use these steps:
-
Open Start.
-
Search for Command Prompt, right-click the top result, and select the Run as administrator option.
-
Type the following command to create a new account and press Enter:
net user USER-NAME PASSWORD /add
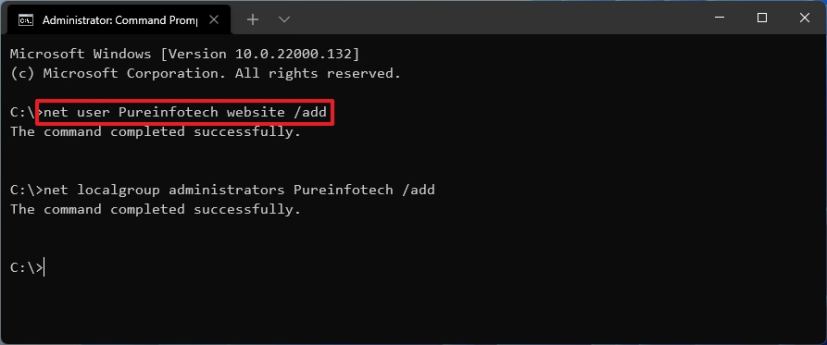
In the command, change “USER-NAME” and “PASSWORD” with the credentials you want to use for the new user account.
-
Type the following command to make the newly created account administrator and press Enter:
net localgroup administrators USER-ACCOUNT /add
In the command, replace “USER-ACCOUNT” with the account name you want to add to the administrators’ group.
After you complete the steps, the administrator account will be created on Windows 11.
Create local administrator account from PowerShell on Windows 11
To create a local administrator account from PowerShell, use these steps:
-
Open Start.
-
Search for PowerShell, right-click the top result, and select the Run as administrator option.
-
Type the following command to temporarily store the password inside a string in the “$Password” variable and press Enter:
$Password = Read-Host -AsSecureString
-
Type the password for the new Windows 11 admin account and press Enter.
-
Type the following command to create the new administrator account with PowerShell and press Enter:
New-LocalUser "NEW-ACCOUNT-NAME" -Password $Password -FullName "USER-FULL-NAME" -Description "DESCRIPTION"
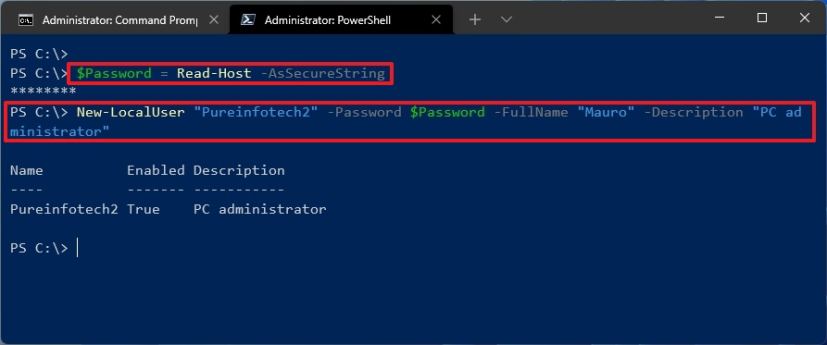
In the command, change “NEW-ACCOUNT-NAME” for the account name and “USER-FULL-NAME” for the user’s full name. Also, replace “DESCRIPTION” with the description you want to use for the account.
-
Type the following command to add the account to the Administrators user group and press Enter:
Add-LocalGroupMember -Group "Administrators" -Member "NEW-ACCOUNT-NAME"

In the command, change NEW-ACCOUNT-NAME for the account name.
Once you complete the steps, the new administrator local account will be created on Windows 11, giving the user full access to the device.
