- To create a shortcut on Windows 11, right-click on the desktop, select “New,” choose the “Shortcut” option, and continue with the on-screen directions. You can access the same option from the “New” menu in File Explorer.
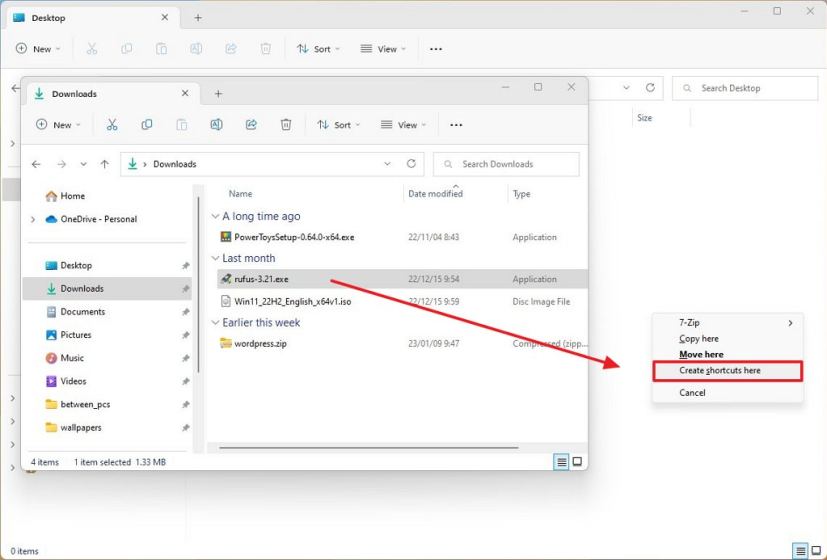
- Alternatively, use the “Shift + Right-click” action on a file or folder and select the “Create Shortcut” button. Or right-click and drag the file or folder to the desktop (or folder) and select the “Create shortcut here” option.
On Windows 11, you can create shortcuts for files, folders, apps, and websites quite easily in multiple ways, and in this guide, you will learn how.
Shortcuts are links that point to a specific location or file for faster access, saving you time and clicks. Usually, you would create shortcuts (commonly on the desktop) to things or places to use frequently.
Windows 11 offers two types of shortcuts, including the traditional shortcuts, which are files you can copy and paste on any location, and then there are pins that you can only place in the Taskbar or Start menu.
This guide will teach you how to create traditional shortcuts on the desktop or inside a folder on Windows 11.
- Create shortcuts for files, folders, and apps on Windows 11
- Create shortcuts for websites on Windows 11
- Customize shortcut on Windows 11
Create shortcuts for files, folders, and apps on Windows 11
On Windows 11, you can create shortcuts in at least four ways. Here’s how.
1. Shortcut wizard
To create a shortcut on the desktop (or folder) on Windows 11, use these steps:
-
Right-click on the desktop, select New, and choose the Shortcut option. (In File Explorer, click on New and select the Shortcut option.)

-
Click the Browse button.
-
Select the file to create a shortcut.
-
Click the OK button.
-
Click the Next button.

-
Confirm a name for the shortcut.
-
Click the Finish button.
2. Context menu
To create a Windows 11 shortcut from the context menu, use these steps:
-
Open File Explorer.
-
Browse to the file location to create the shortcut.
-
“Shift + Right-click” the file and select the Create Shortcut button.
 Quick note: If you are in one of the system folders, you can’t create a shortcut in that location. In this case, click the Yes button to send the shortcut to the desktop.
 -
(Optional) Copy and paste the shortcut in the preferred location.
3. Drag and drop menu
To create a shortcut for a file or app with the drag-and-drop menu, use these steps:
-
Open File Explorer.
-
Browse to the file location to create the shortcut.
-
“Right-click and drag the file” to the desktop (or folder) and select the “Create shortcut here” option.

4. Start menu
To create a shortcut for an app from the Start menu, use these steps:
-
Open Start.
-
Click the All apps button.
-
“Left-click and drag the app” to the desktop (or folder) to create the shortcut.

Once you complete the steps, the shortcut will be created on the desktop to access the file or location faster.
Create shortcuts for websites on Windows 11
On Windows 11, you have at least two ways to create a shortcut for a website on the desktop. Here’s how.
1. Drag and drop
The easiest way to create a website shortcut is to click and drag the website icon to the desktop (or folder) on Windows 11.

2. Shortcut wizard
To create a website shortcut to the desktop using the Windows 11 wizard, use these steps:
-
Right-click on the desktop, select New, and choose the Shortcut option.

-
Confirm the website link (URL) in the location setting.

-
Click the Next button.
-
Confirm a name for the shortcut.
-
Click the Finish button.
After you complete the steps, the website shortcut will be created on the desktop. If you double-click the item, it’ll open with the default web browser. If you use another browser, you must change the system settings to change the default browser.
Customize shortcut on Windows 11
To change the shortcut icon or name on Windows 11, use these steps:
-
Right-click the shortcut and select the Properties option.
-
Click the Shortcut tab.
-
Click the Change Icon button.

-
Select the new icon for the shortcut.
 Quick tip: All the default Windows icons are located in this path:
%SystemRoot%\System32\SHELL32.dll. -
Click the OK button.
-
Click the Apply button.
-
Click the OK button.
-
(Optional) Right-click the shortcut and select the Rename option.
-
Confirm the new name and press Enter.
Once you complete the steps, the shortcut will reflect the new icon and name on Windows 11.
If the shortcuts seem small on the desktop, you can change their sizes by right-clicking the desktop, selecting View, and choosing between the medium or large options.
