
- To uninstall apps on Windows 10, open Settings > Apps > Apps & features, select the app, click “Uninstall,” and click “Uninstall” again. If you’re removing a Win32 program, you may need to complete some additional steps.
- Another way to remove an app, open Control Panel > Uninstall a program, select the app, and click “Uninstall.” You may need to complete some additional steps (as required.)
- You can also remove programs on Windows 10 from the Start menu, Windows Package Manager, PowerShell, Command Prompt, and through the “Optional features” settings page for some specific apps.
- It’s even possible to use third-party tools like Wintoys and Bulk Crap Uninstaller to remove apps and leftover files.
UPDATED 8/24/2023: On Windows 10, the ability to uninstall apps is an essential feature that allows you to remove apps that are no longer needed from your computer. It can also help you to get rid of bloatware, free up space, and troubleshoot problems.
If you won’t be using a specific program or have to reinstall one of them, Windows 10 includes multiple ways to uninstall apps completely using the Settings app, Control Panel, Windows Package Manager, PowerShell, and even Command prompt. In the case that it’s not possible to remove an app, you’re dealing with a system application, or there are problems uninstalling the app, you can use third-party uninstallers, such as Wintoys and Bulk Crap Uninstaller.
In this guide, you will learn the steps to uninstall programs on Windows 10.
Remove apps and programs from Windows 10
On Windows 10, you have at least nine ways to uninstall or remove apps and programs from the computer, and here’s how.
- Uninstall apps from Settings
- Uninstall apps from Start menu
- Uninstall apps from Optional features
- Uninstall apps from Windows Package Manager
- Uninstall apps from Control Panel
- Uninstall apps from PowerShell
- Uninstall apps from Command Prompt
- Uninstall apps with Wintoys
- Uninstall apps with BC Uninstaller
Uninstall apps from Settings
To uninstall an app on Windows 10, use these steps:
-
Open Settings on Windows 10.
-
Click on Apps.
-
Click on Apps & features.
-
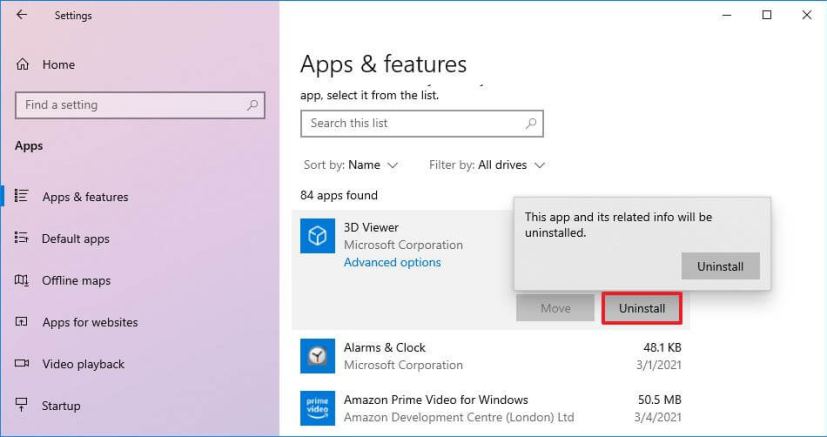
Under the “Apps & features” section, select the app to remove.
Quick tip: If you have a lot of apps, you can use the search box, the “Sort by” and “Filter by” options to find the app faster. -
Click the Uninstall button.
-
Click the Uninstall button again.
Quick note: If you are removing a classic desktop program, continue with the on-screen directions to complete the process.
Once you complete the steps, the application will be removed from your computer.
If the app has the “Uninstall” button grayed out, you may have stumbled upon a system application that can’t be removed from the Settings. You may still delete this app, but you will need to go through a more complex process using PowerShell using the steps below.
Uninstall apps from Start menu
To remove apps on Windows 10 from the Start menu, use these steps:
-
Open Start.
-
Right-click the application and select the Uninstall button.
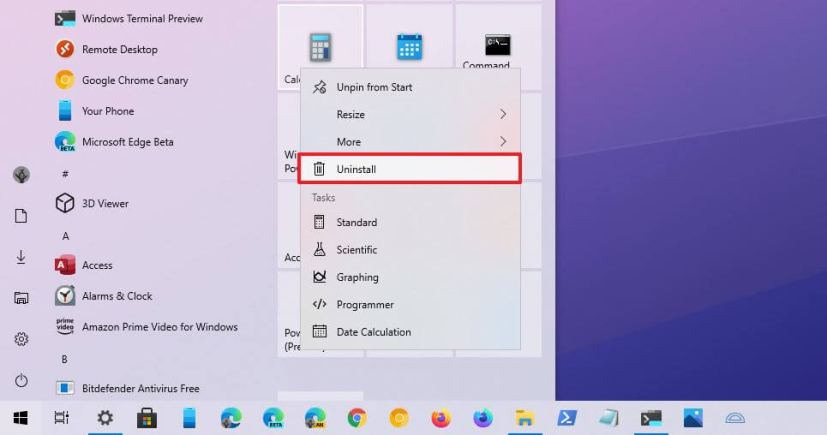
- Click the Uninstall button again.
After you complete the steps, the Microsoft Store application will be removed from the computer.
Uninstall apps from Optional features
Through the Settings app, you can also remove system apps known as “features on-demand,” including apps like Notepad, Paint, WordPad, Windows Media Player, and many others.
To remove optional features on Windows 10, use these steps:
-
Open Settings.
-
Click on Apps.
-
Click on Apps & features.
-
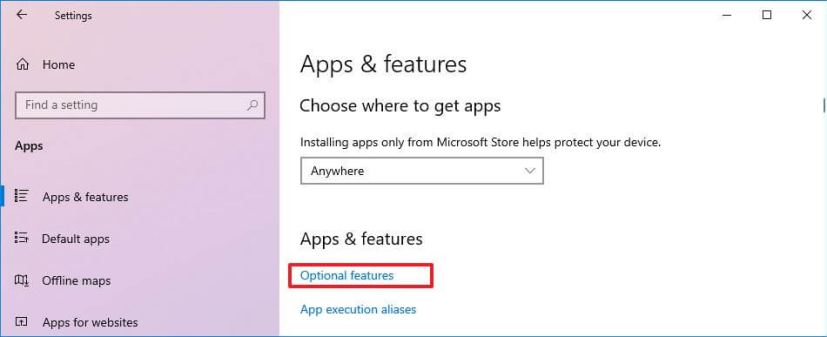
Under the “Apps & features” section, click the Optional features option.
-
Select the app you want to uninstall – for example, Notepad, WordPad, and Microsoft Paint.
-
Click the Uninstall button.
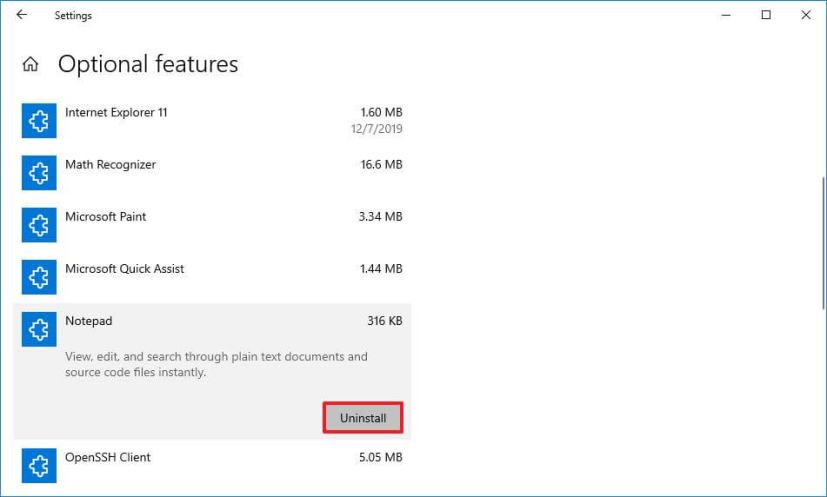
After you complete the steps, the system application will no longer be available on the device.
Uninstall apps from Windows Package Manager
Windows Package Manager (winget) is a command-line tool available on Windows 10, and it has been designed to save you time and frustration by automating the process of searching, downloading, installing, uninstalling, upgrading, and configuring software.
To remove a program with the winget command on Windows 10, use these steps:
-
Open Start.
-
Search for Command Prompt, right-click the top result, and select the Run as administrator option.
-
Type the following command to view a list of the apps you can uninstall with the Windows Package Manager and press Enter:
winget list
-
Type the following command to uninstall an app with winget and press Enter:
winget uninstall "APP-NAME"
In the command, change “APP-NAME” for the app’s actual name. Quotations are only required if the app has spaces in the name. For example, this command uninstalls the Microsoft Teams app on Windows 10:
winget uninstall "microsoft teams"
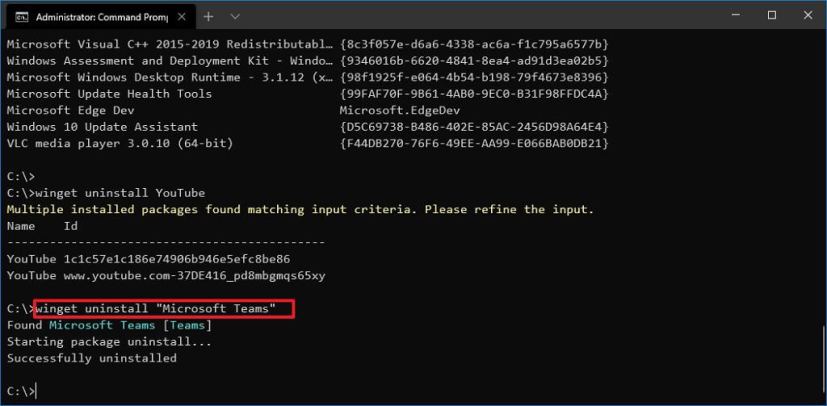
Once you complete the steps, the app will be removed from the computer. If you are removing a traditional desktop application, the app uninstaller interface may appear with additional steps to complete the uninstall.
Uninstall apps from Control Panel
On Windows 10, you can still use the Control Panel to remove programs, but only classic apps, not the ones you install from Microsoft Store.
To uninstall a classic desktop program (Win32) on Windows 10, use these steps:
-
Open Control Panel.
-
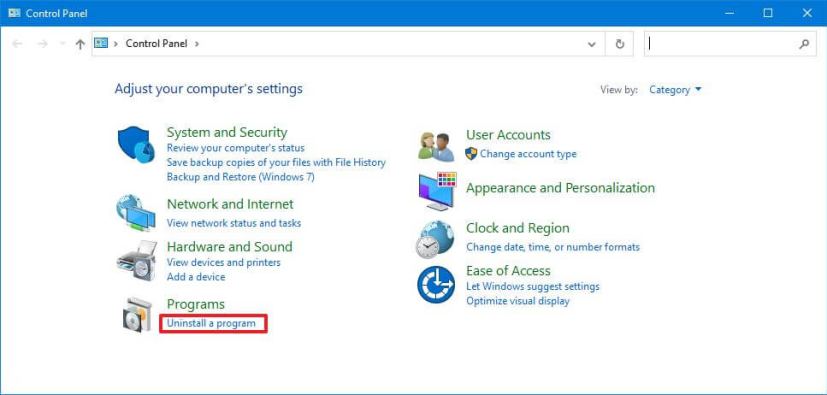
Under the “Programs” category, click the Uninstall a program option.
-
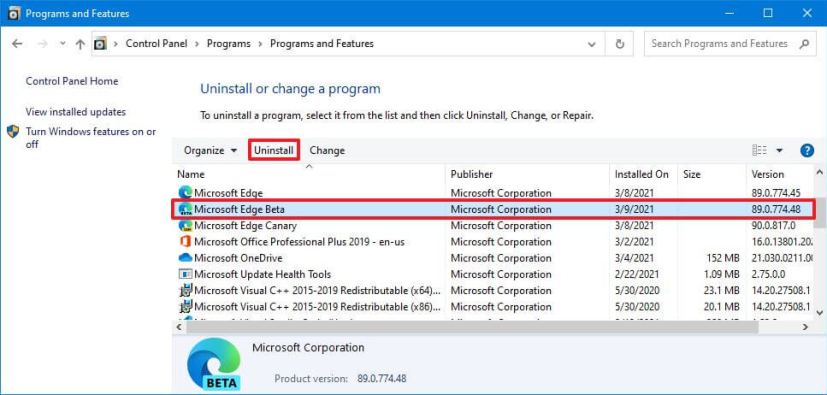
Select the program to remove from Windows 10.
-
Click the Uninstall button.
-
Continue with the on-screen directions (if applicable).
After you complete the steps, the Win32 app will be removed from Windows 10. You can always repeat the instructions to uninstall other apps.
Uninstall apps from PowerShell
Although it is possible to use the Settings app to remove classic and modern apps, you still cannot uninstall many built-in apps like Camera, Alarms & Clock, Cortana, and many others, and this is when PowerShell comes in handy. In addition to using Settings and Control Panel, you can also use PowerShell to uninstall classic, modern, and built-in apps and tools.
To remove a program on Windows 10 PowerShell on Windows 10, use these steps:
-
Open Start.
-
Search for PowerShell, right-click the top result, and click the Run as administrator option.
-
Type the following command to view all the apps installed on your device and press Enter:
Get-AppxPackage
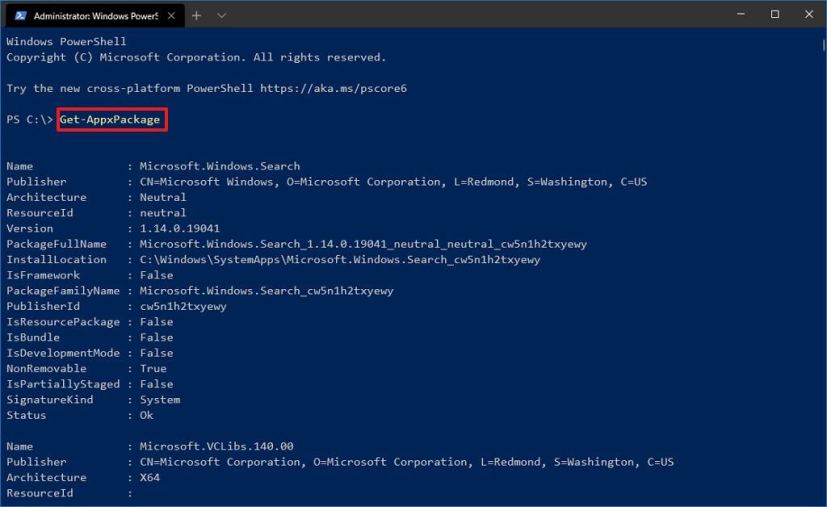
If you want to see all the Windows apps installed on the computer, type the following command and press Enter:
Get-AppxPackage -AllUsers
In the output, you will see a long list of apps, which can be overwhelming, but you need to do this to know the name of the apps you want to uninstall. For example, if you want to uninstall the “Camera” app, you will notice that the system name is “Microsoft.WindowsCamera” in the listing.
-
Type the following command to uninstall an app and press Enter:
Get-AppxPackage PROGRAM-NAME | Remove-AppxPackage
In the command, make sure to replace “PROGRAM-NAME” with the application’s actual name, as listed in the above step. For example, this command uninstalls Cortana on Windows 10:
Get-AppxPackage Microsoft.549981C3F5F10 | Remove-AppxPackage
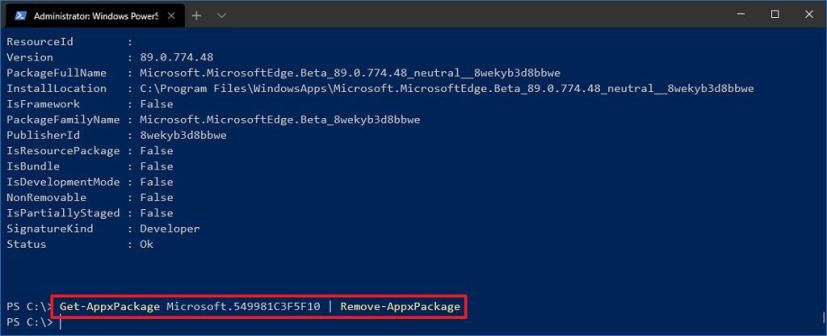
Once you complete the steps, the app will no longer be available on your device, but you can always reinstall it using the Microsoft Store.
Uninstall apps from Command Prompt
Alternatively, you can also use Command Prompt to uninstall applications using the Windows Management Instrumentation Command-line (WMIC) tool, but only classic desktop programs, not Microsoft Store apps.
To remove apps with the WMIC command-line tool on Windows 10, use these steps:
-
Open Start.
-
Search for Command Prompt, right-click the top result, and select the Run as administrator option.
-
Type the following command to launch the WMIC tool and press Enter:
wmic
-
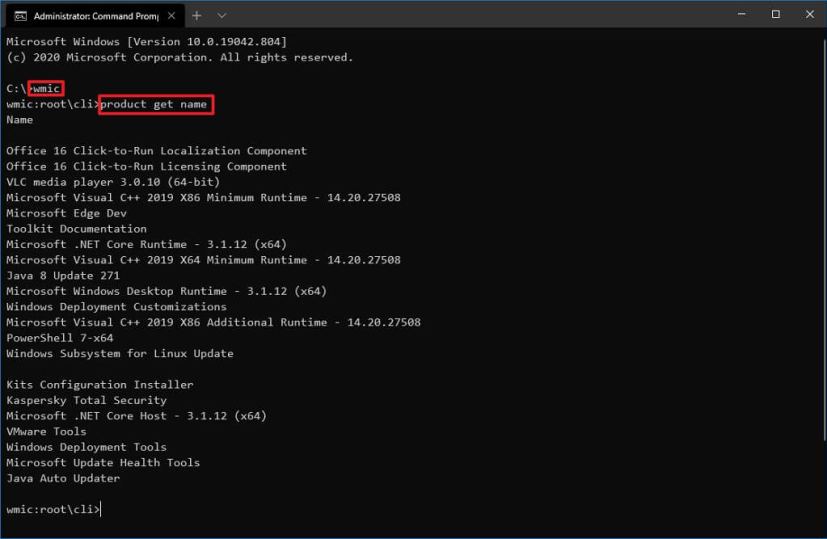
Type the following command to list all the installed applications and press Enter:
product get name
-
Type the following command to uninstall a program and press Enter:
product where name="PROGRAM-NAME" call uninstall
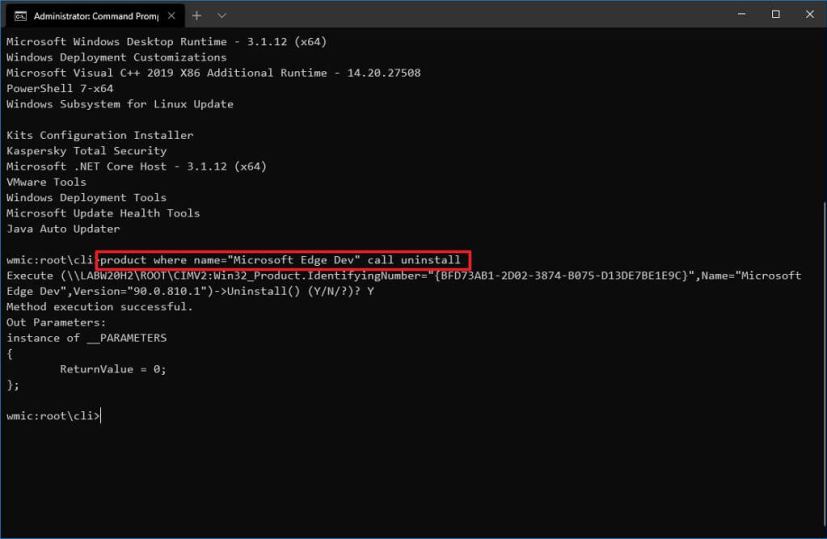
In the command, make sure to replace “PROGRAM-NAME” with the application’s actual name, as listed in the above step. For example, this command removes the Microsoft Edge Dev app:
product where name="Microsoft Edge Dev" call uninstall
-
Type “Y” to confirm the uninstall process.
Once you complete the steps, the program you specified in the command will be uninstalled from the Windows 10 installation.
Uninstall apps with Wintoys
Wintoys is a non-Microsoft software that makes it easier to remove first and third-party applications as well as those apps that Microsoft considers essentials for the system and blocks users from uninstalling them. In addition, the app provides other ways to optimize the operating system, such as tweaking settings and access tools to quickly repair the system.
You can install Wintoys from the Microsoft Store or through the Windows Package Manager with the winget install --id 9P8LTPGCBZXD command.
To remove apps through Wintoys on Windows 10, use these steps:
-
Open Wintoys.
-
Click on Apps.
-
Click the menu (three-dots) button and select the Uninstall option.

-
Continue with the on-screen directions (if applicable).
After you complete the steps, the app will uninstall immediately without confirmation from Windows 10. The menu also includes options to terminate the application, open the folder location, reset, and more.
The Wintoys app works on Windows 10 and Windows 11. This guide will walk you through everything you need to know about how to use the app.
Uninstall apps with BC Uninstaller
The Bulk Crap Uninstaller (BCU or BC Uninstaller) is a third-party open-source advanced application that allows you to uninstall one or multiple applications in bulk without minimal interaction on your part. The app can also clean leftover files and entries, detect orphaned apps, and more. This third-party uninstaller software has been around for a long time, and it works on Windows 7, 8, 8.1, 10, and 11.
The BC Uninstaller is available on GitHub, and you can download the installer or portable (recommended) from different download sources, such as OSDN. Once you download the application, choose the “.zip” file on File Explorer, click the “Extract all” button, and continue with the on-screen directions to complete the extraction.
To uninstall apps through Bulk Crap Uninstaller on Windows 10, use these steps:
-
Open File Explorer.
-
Open the folder containing the Bulk Crap Uninstaller files.
-
Double-click the BCUninstaller.exe to launch the app.
Quick tip: If this is the first time running the app, you will need to complete the initial wizard using the default settings. -
(Optional) Under the “Filters” section, choose the options to filter and find the apps to remove from Windows 10.
-
Select the app from the list.
-
Click the Uninstall button.

-
Click the Continue button.

-
Click the “Kill all” button to close other apps and services (if applicable).

-
(Optional) Select the uninstall settings.
 Quick note: The default settings should be enough for most situations.
 -
Click the Continue button.
-
Click the Begin Uninstallation button.

-
Continue with the on-screen directions (if applicable).
Once you complete the steps, depending on the settings, the Bulk Crap Uninstaller will continue removing the app from Windows 10. You may also be prompted to scan for leftover files after removing the app. If this is the case, it’s recommended to proceed to make sure the app and apply other files a completely removed from the system.
