
UPDATED 9/29/2023: Windows 11 23H2 (2023 Update) has the same hardware requirements as versions 22H2 and 21H2. According to the company, “version 23H2 shares the same servicing branch and code base as Windows 11, version 22H2.” This means that the upgrade “will be a simple update to version 23H2 via a small enablement package” without reinstallation. If your computer is already running Windows 11 22H2, it’s then compatible with version 23H2.
However, if you plan to upgrade a device running Windows 10, the hardware has to meet the minimum requirements, including a 64-bit dual-core processor, 4GB of RAM, 64GB of storage, Trusted Platform Module (TPM) version 2.0, and Secure Boot. Also, as part of the installation process, you must create an account with a Microsoft account with an internet connection. Otherwise, you won’t be able to complete the setup on a new installation.
This guide will go through the new system requirements to install Windows 11 and the steps to check whether your computer will run the new version of the operating system.
- Windows 11 23H2 system requirements
- Windows 11 23H2 supported processors
- Windows 11 23H2 features requirements
- Windows 11 23H2 compatibility check
- Windows 11 23H2 enable TPM 2.0 and Secure Boot
Windows 11 23H2 system requirements
Windows 11 23H2 hardware requirements:
- Processor: 1GHz or faster CPU or System on a Chip (SoC) with two or more cores.
- RAM: 4GB.
- Hard drive: 64GB or larger.
- System firmware: UEFI, Secure Boot capable.
- TPM: Trusted Platform Module (TPM) version 2.0.
- Graphics: Compatible with DirectX 12 or later with WDDM 2.0 driver.
- Display resolution: High definition (720p) display greater than 9″ diagonally, 8 bits per color channel.
- Networking: Microsoft account and internet connectivity.
You will also need a Microsoft account and internet connection to complete the setup when setting up Windows 11 Pro or Home. Otherwise, you won’t be able to complete the out-of-box experience (OOBE), which means that the Pro and Home editions no longer support local accounts, at least not during the initial setup.
Windows 11 23H2 supported processors
As the original version, Windows 11 23H2 is only compatible with some processors, including Intel Core 8th Gen and higher processors and some Pentium, Atom, Celeron, and Xeon CPUs. On the AMD side, the operating system only supports the second-generation Ryzen (including Threadripper) and newer processors, alongside some EPYC and Athlon CPUs. As for ARM support, the latest version of Windows will support Qualcomm Snapdragon 850, 7c, 8c, and 8cx first and second generations, and the Microsoft SQ1 and SQ2.
Furthermore, the 7th Gen Intel processors are also supported, but only the 7820HQ chip. In addition, Intel’s Core X and Xeon W processors are supported, but only if the device comes with Declarative, Componentized Hardware Support Apps (DCH) drivers.
Here’s the list of the supported processors from Intel, AMD, and Qualcomm.
Intel supported processors
- 8th Gen (Coffee Lake).
- 9th Gen (Coffee Lake Refresh).
- 10th Gen (Comet Lake and Ice Lake).
- 11th Gen (Rocket Lake and Tiger Lake).
- 12th Gen (Alder Lake).
- 13th Gen (Raptor Lake).
- Pentium – Gold and Silver.
- Xeon – Skylake-SP, Cascade Lake-SP, Cooper Lake-SP, Ice Lake-SP
- All supported Intel processors.
AMD supported processors
- Ryzen 2000, 3000, 4000, 5000, 6000, 7000 (including 3D V-cache chips).
- Ryzen Threadripper Pro 59xxWX.
- Ryzen Embedded V25xx and V27xx.
- EPYC 2nd Gen and 3rd Gen.
- Athlon – Gold, Silver, 3xxx, 300x.
- All supported AMD processors.
Qualcomm supported processors
- Snapdragon 850.
- Snapdragon 7c.
- Snapdragon 8c.
- Snapdragon 8cx.
- Snapdragon 8cx (Gen2).
- Microsoft SQ1.
- Microsoft SQ2.
- All supported Qualcomm processors.
On unsupported devices, you may still be able to upgrade (at your own risk) from the ISO file or USB bootable media. However, the computer will still need a 64-bit processor with at least two cores, 4GB of RAM, 64GB of storage, and an enabled TPM 1.2 chip and Secure Boot.
Windows 11 23H2 features requirements
Here are the hardware requirements to support specific features:
- 5G support: requires a 5G capable modem.
- Auto HDR: requires an HDR monitor.
- BitLocker to Go: requires a USB flash drive.
- Client Hyper-V: requires a processor with second-level address translation (SLAT) capabilities (available in Windows Pro and above editions).
- DirectStorage: requires 1 TB or greater NVMe SSD to store and run games that use the “Standard NVM Express Controller” driver and a DirectX 12 Ultimate GPU.
- DirectX 12 Ultimate: available with supported games and graphics chips.
- Presence requires a sensor that can detect human distance from the device or intent to interact with the device.
- Intelligent Video Conferencing: This feature requires a video camera, microphone, and speaker (audio output).
- Multiple Voice Assistant (MVA): requires a microphone and speaker.
- Snap three-column layouts: require a screen that is 1920 effective pixels or greater in width.
- Mute/Unmute from Taskbar: requires a video camera, microphone, and speaker (audio output). The app must be compatible with features to enable global mute/unmute.
- Spatial Sound: requires supporting hardware and software.
- Touch: requires a screen or monitor that supports multi-touch.
- Two-factor authentication requires using a PIN, biometric (fingerprint reader or illuminated infrared camera), or a phone with Wi-Fi or Bluetooth capabilities.
- Voice Typing: requires a microphone.
- Wake on Voice: requires a Modern Standby power model and microphone.
- Wi-Fi 6E: requires new WLAN IHV hardware and driver and a Wi-Fi 6E capable access point or router.
- Windows Hello: requires a camera configured for near-infrared (IR) imaging or a fingerprint reader for biometric authentication. Devices without biometric sensors can use Windows Hello with a PIN or a portable Microsoft-compatible security key.
- Windows Projection: requires a display adapter that supports Windows Display Driver Model (WDDM) 2.0 and a Wi-Fi adapter that supports Wi-Fi Direct.
Windows 11 23H2 compatibility check
On Windows 10, it’s possible to use the “Microsoft PC Health Check” app to confirm the system requirements. If the system configuration isn’t compatible, the app will give you details of the components that are not compatible.
To check if your Windows 10 computer will run Windows 11 23H2, use these steps:
-
Under the “Check for compatibility” section, click the “Download PC Health Check app” button.
-
Double-click the WindowsPCHealthCheckSetup.msi file.
-
Click the “I accept the terms in the License Agreement” option.
-
Click the Install button.
-
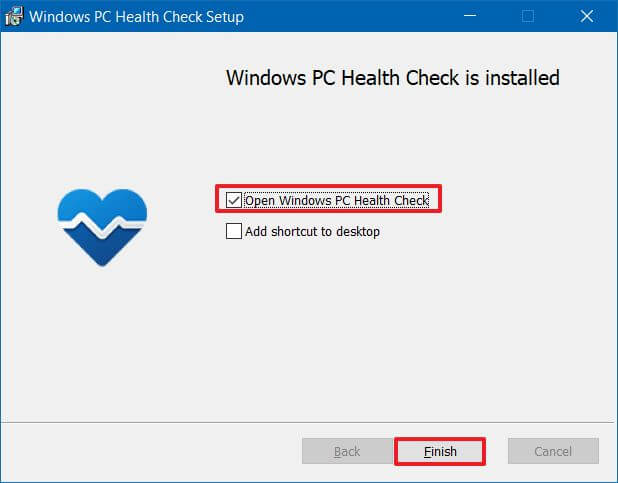
Check the “Open Windows PC Health Check” option.
-
Click the Finish button.
-
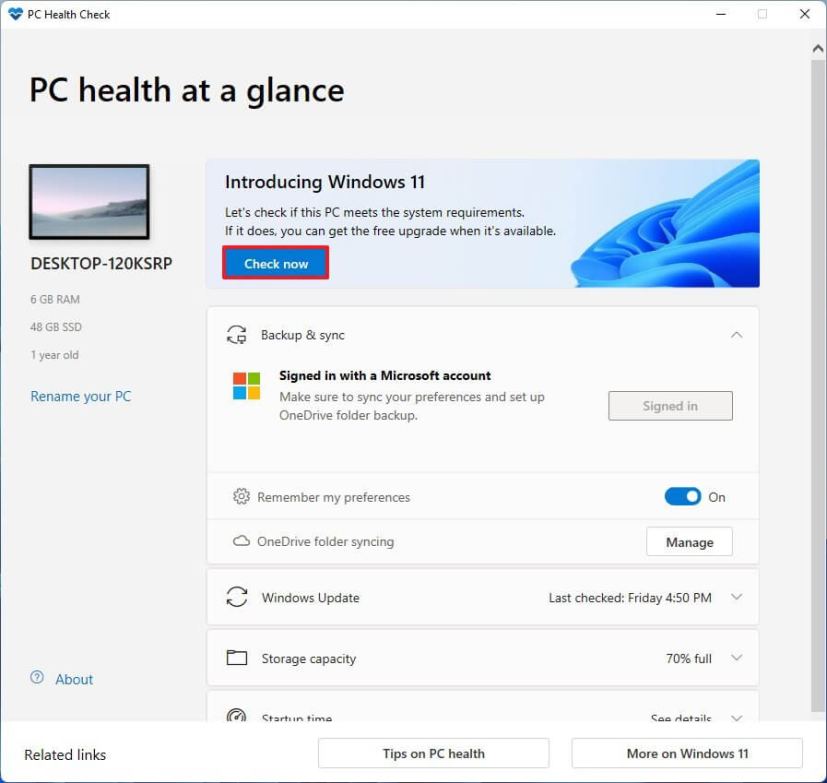
Under the “Introducing Windows 11” section, click the Check now button.
-
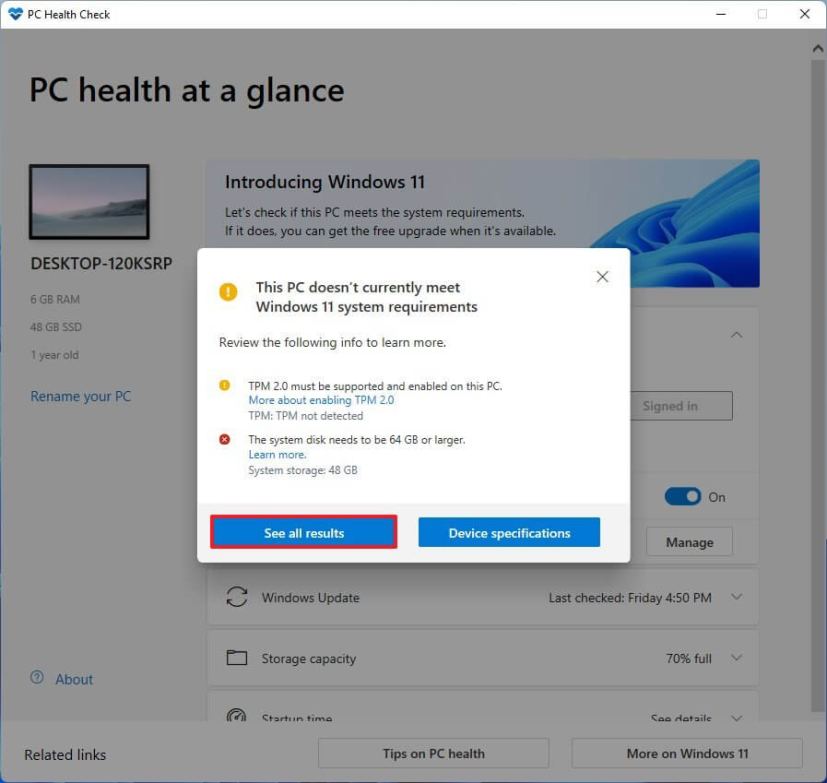
(Optional) Click the “See all results” button to view a list of the components that passed the compatibility.
-
(Optional) Click the Device specifications button to understand the system requirements better.
Once you complete the steps, if the hardware is compatible, you will receive a message confirming you can upgrade to Windows 11 23H2 from Windows 10. If the hardware does not pass the check, you’ll receive a message detailing why the device can run the operating system.
Windows 11 23H2 enable TPM 2.0 and Secure Boot
On Windows 11, one of the most important requirements is the Trusted Platform Module (TPM) version 2.0 and Secure Boot because they’re required for security and to prevent threats against hardware and firmware, common malware, ransomware, and other attacks.
The following information only applies to users with devices running Windows 10 and planning to upgrade to Windows 11.
Check for TPM 2.0
To determine if TPM is enabled on the computer, use these steps:
-
Open Start.
-
Search for tpm.msc and click the top result to open the “Trusted Platform Module (TPM) Management” tool.
-
In the “Status and TPM Manufacturer Information” section, confirm TPM is present and version.
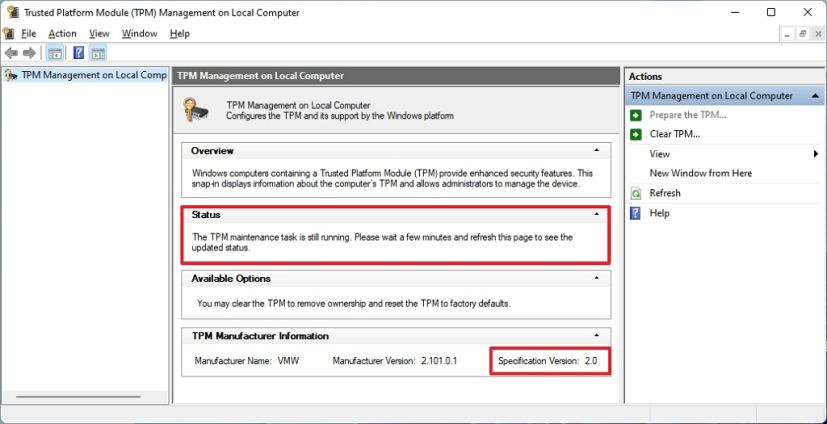
You’ll see the hardware information and its status if the device includes TPM. Otherwise, if it reads “Compatible TPM cannot be found,” the chip is disabled on the UEFI, or the computer doesn’t have the module.
Enable TPM 2.0 inside UEFI
To enable TPM 2.0 on Windows 10 for Windows 11 23H2, use these steps:
-
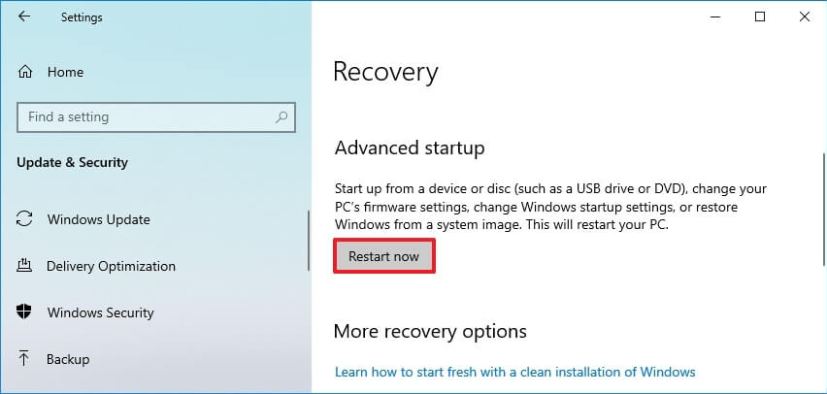
Open Settings.
-
Click on Update & Security.
-
Click on Recovery.
-
Under the “Advanced startup” section, click the Restart now button.
-
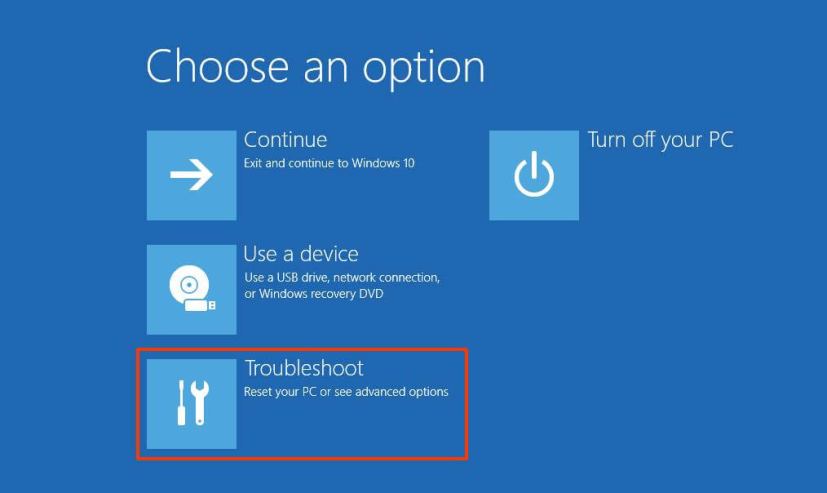
Click on Troubleshoot.
-
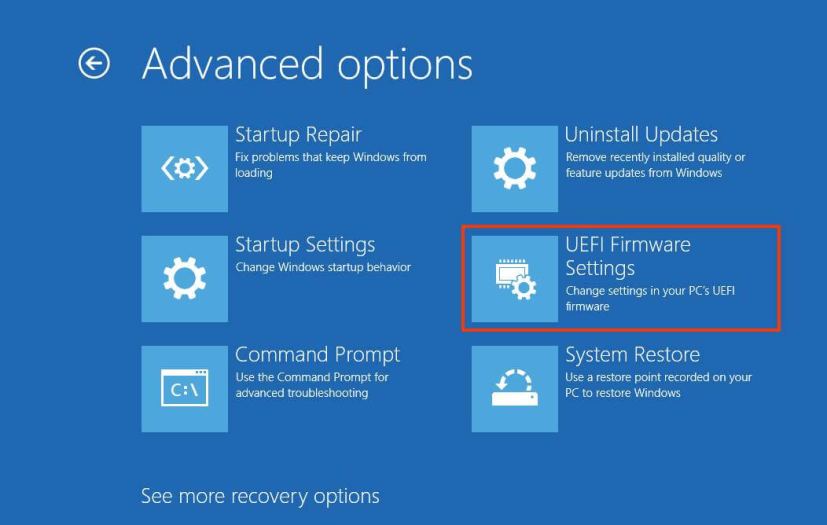
Click on Advanced options.
-
Click the “UEFI Firmware settings” option.
-
Click the Restart button.
-
Click the advanced, security, or boot settings page, depending on the motherboard.
-
Select the TPM 2.0 option and choose the Enabled option.
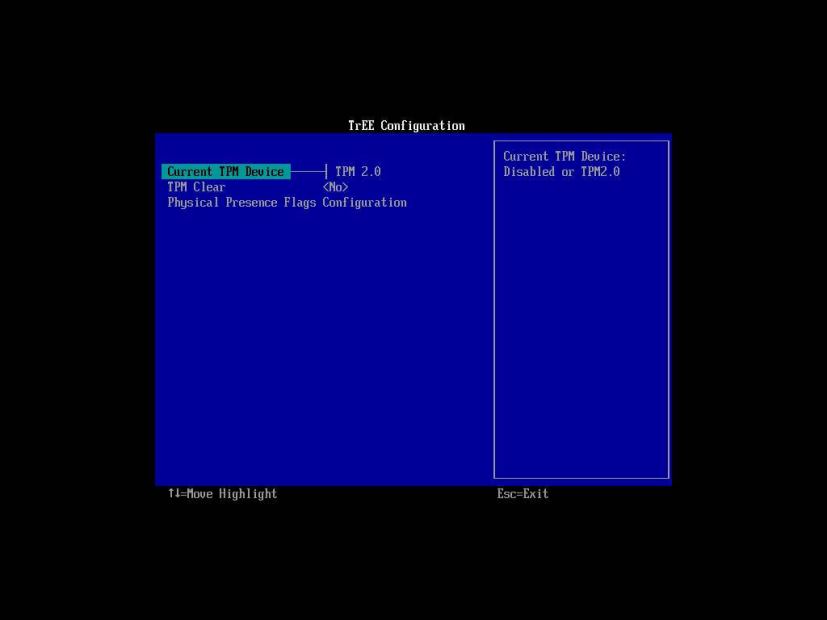
If the motherboard doesn’t have a TPM chip and you are running an AMD processor, the module is likely built into the processor, and the option will be available as “fTPM” (firmware-based TPM 2.0) or “AMD fTPM switch.” If the device is an Intel-based system, TPM will be available as Platform Trust Technology (PTT).
In the case that the computer doesn’t have a TPM option and this is a custom build, you may be able to purchase a module to add the support. However, consult the manufacturer’s website to confirm that the support exists.
After you complete the steps, the Windows 11 check should pass, allowing you to upgrade the computer to the new OS.
Check for Secure Boot
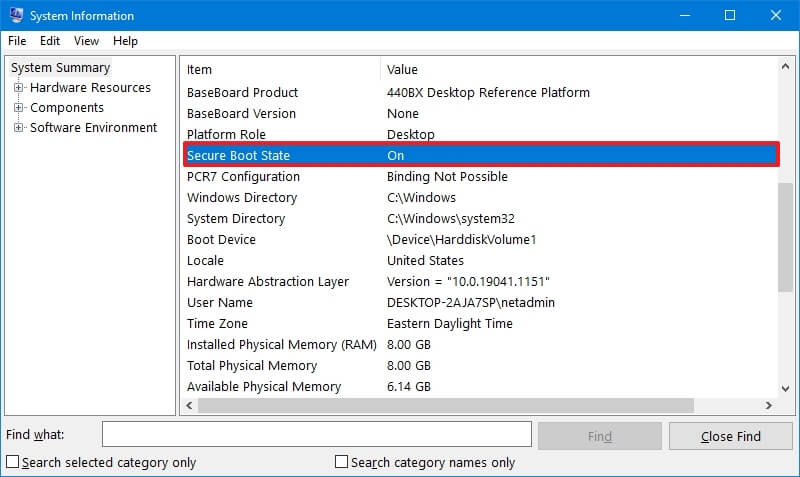
To determine whether Secure Boot is enabled to install Windows 11 23H2, use these steps:
-
Open Start.
-
Search for System Information and click the top result to open the app.
-
Click on System Summary on the left pane.
-
Check the “Secure Boot State” information and confirm the feature is set to “On.” If it’s not, you need to enable the option manually.
Once you complete the steps, you may be able to install the Windows 11 2023 Update. Otherwise, follow the steps to enable it inside the motherboard’s firmware.
Enable Secure Boot for Windows 11
If the device uses the legacy BIOS, you must convert the MBR drive to GPT, switch to UEFI mode, and enable Secure Boot. Otherwise, the computer won’t boot. If you attempt to perform a clean installation, you can skip the convention, but this is a requirement to upgrade from Windows 10.
To enable Secure Boot to install Windows 11 23H2, use these steps:
-
Open Settings.
-
Click on Update & Security.
-
Click on Recovery.
-
Under the “Advanced startup” section, click the Restart now button.
-
Click on Troubleshoot.
-
Click on Advanced options.
-
Click the “UEFI Firmware settings” option.
-
Click the Restart button.
-
Click the advanced, security, or boot settings page, depending on the motherboard.
-
Select the “Secure Boot” option and choose the Enabled option.
After you complete the steps, the device should pass the hardware verification to perform an in-place upgrade or clean install of Windows 11 23H2.
Update September 29, 2023: Microsoft has also released its new Windows Hardware Compatibility Program Guidance (WHCP) for version 23H2 and further confirms that there are no requirements changes going from version 22H2 to 23H2.
Mauro Huculak is a Windows expert and the Editor-in-Chief who started Pureinfotech in 2010 as an independent online publication. He is also been a Windows Central contributor for nearly a decade. Mauro has over 12 years of experience writing comprehensive guides and creating professional videos about Windows, software, and related technologies, including Android and Linux. Before becoming a technology writer, he was an IT administrator for seven years. In total, Mauro has over 20 years of combined experience in technology. Throughout his career, he achieved different professional certifications from Microsoft (MSCA), Cisco (CCNP), VMware (VCP), and CompTIA (A+ and Network+), and he has been recognized as a Microsoft MVP for many years. You can follow him on X (Twitter), YouTube, LinkedIn and About.me.