On Windows 11, the Windows Subsystem for Linux (WSL) ships with a new feature that allows you to attach and mount physical drives to access Linux file systems (for example, ext4) not natively supported on Windows.
The new feature allows users to access Linux files using File Explorer on a dual-boot system running Windows 11 and a Linux distro on a different drive.
In this guide, you will learn the steps to mount and unmount drives using the Windows Subsystem for Linux.
- Mount Linux file system on Windows 11
- Mount any Linux file system on Windows 11
- Access Linux file system on Windows 11
- Unmount Linux file system on Windows 11
Mount Linux file system on Windows 11
To mount a Linux file system using WSL, use these steps:
-
Open Start on Windows 11.
-
Search for PowerShell, right-click the top result, and select the Run as administrator option.
-
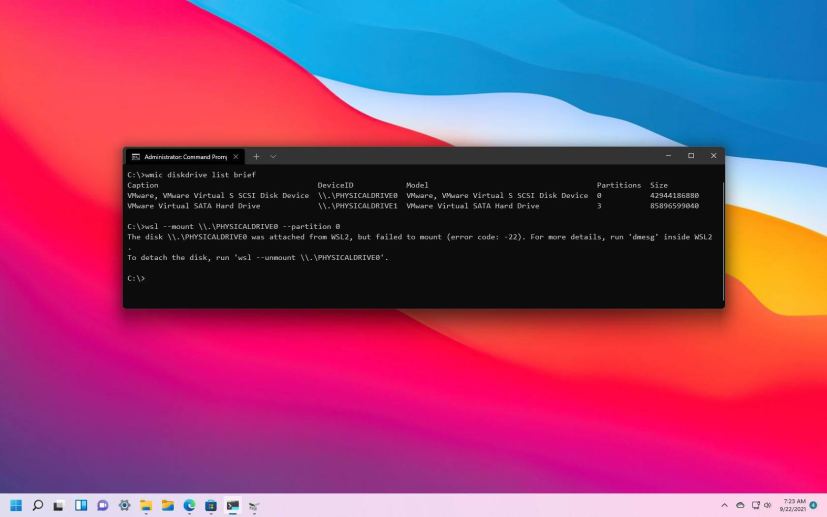
Type the following command to list the available physical disks and press Enter:
wmic diskdrive list brief
-
Confirm the drive path under the “Device ID” column.
-
Type the following command to mount the Linux file system and press Enter:
wsl --mount DISKPATH

In the command, make sure to replace DISKPATH for the drive path with the Linux distribution you want to mount. For example,
wsl --mount \\.\PHYSICALDRIVE2. If you’re going to mount a specific partition, you’ll need to use the--partitionoption with the partition number. For example,wsl --mount \\.\PHYSICALDRIVE2 --partition 1.
Once you complete the steps, the drive with Linux files will mount, and it’ll be visible from Windows 11.
Mount any Linux file system on Windows 11
The previous steps only attempt to mount a physical drive as ext4. If you want to specify another file system, you will need to use a different command with the Windows Subsystem for Linux 2 (WSL2).
To mount a specific Linux file system on Windows 11, use these steps:
-
Open Start.
-
Search for PowerShell, right-click the top result, and select the Run as administrator option.
-
Type the following command to list the available physical disks on Windows 11 and press Enter:
wmic diskdrive list brief
-
Confirm the drive path under the “Device ID” column.
-
Type the following command to mount a drive and press Enter:
wsl --mount DISKPATH -t FILESYSTEM
In the command, make sure to replace DISKPATH and FILESYSTEM for the path of the Linux drive and file system you want to mount. For example, to mount a disk as
fat, use this command:wsl --mount DISKPATH -t vfat.
After you complete the steps, the drive with Linux files will mount, and it will be accessible using File Explorer.
Access Linux file system on Windows 11
To access files from a Linux file system on Windows 11, use these steps:
-
Open File Explorer.
-
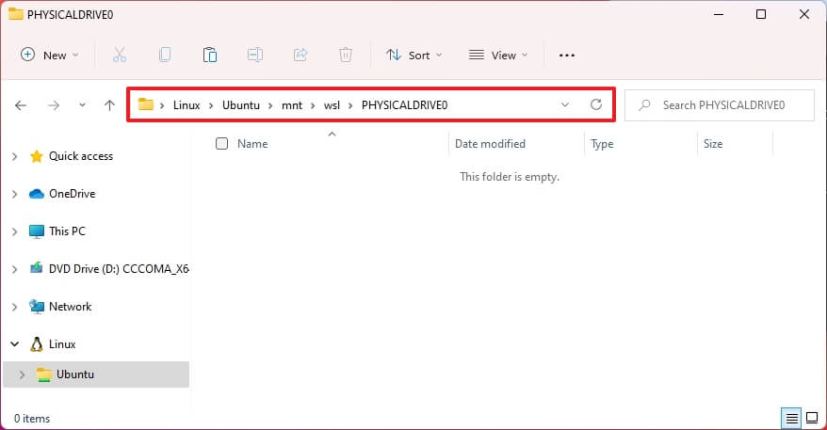
Click the Linux item from the left navigation pane.
-
In the address bar, navigate to
\wsl$and then access the mount folder. For example,\\wsl$\\DISTRO-NAME\\MOUNT-POINT.
Once you complete the steps, you should be able to browse the Linux files from a natively unsupported file system on Windows 11. In addition to using File Explorer, you can access file systems like “ext4” from the WSL2 console using command lines once the drive is mounted.
Unmount Linux file system on Windows 11
To unmount the Linux file system on Windows 11, use these steps
-
Open Start.
-
Search for PowerShell, right-click the top result, and select the Run as administrator option.
-
Type the following command to unmount and detach the drive and press Enter:
wsl --unmount DISKPATH

In the command, make sure to replace DISKPATH for the Device ID of the drive you want to unmount.
After you complete the steps, the drive with the Linux file system will unmount and detach from Windows 11.
