Windows 10 could automatically save a copy of the entire Registry inside the RegBack system folder in previous releases. However, to help reduce storage usage, the OS removed this functionality since the April 2018 Update. As a result, users wanting to recover the system after a corrupt registry hive quickly found that inside the C:\Windows\System32\config\RegBack folder, each registry hive was 0kb in size.
If you want the legacy behavior back, Windows 10 includes a registry key to enable automatic backups again for the entire Registry every time your computer restarts successfully.
In this guide, you will learn the steps to allow Windows 10 to create backups of the Registry every time your computer starts.
Enable automatic backup for Registry
To enable automatic backups of the Registry, use these steps:
-
Open Start on Windows 10.
-
Search for regedit and click the top result to open the Registry.
-
Browse the following path:
HKLM\System\CurrentControlSet\Control\Session Manager\Configuration Manager
-
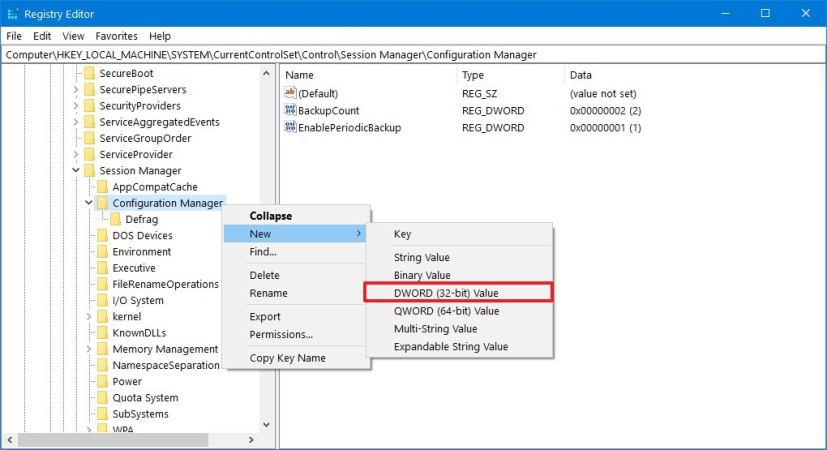
Right-click the Configuration Manager (folder) key, select the New submenu, and click the DWORD (32-bit) Value option.

Configuration Manager registry -
Name the key EnablePeriodicBackup and press Enter.
-
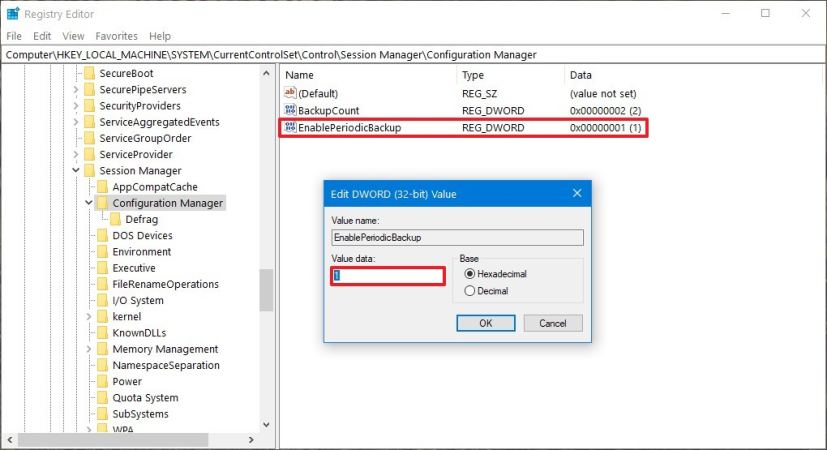
Double-click the newly created DWORD and set the value from 0 to 1.

Configuring EnablePeriodicBackup for automatic Registry backups on Windows 10 -
Click the OK button.
-
Restart your computer.
Once you complete the steps, Windows 10 will create a backup of the entire Registry inside the RegBack folder, and it’ll make a “RegIdleBackup” task in the Task Scheduler to manage future backups.
If the time comes when the computer won’t start because of corruption in one of the registry hives, use this guide to restore the Registry from backup to allow Windows 10 to start correctly.
Create manual backup of Registry
To run the Windows 10 Registry backup manually, use these steps:
-
Open Start.
-
Search for Task Scheduler and click the top result to open the console.
-
Browse the following path:
Task Scheduler Library > Microsoft > Windows > Registry.
-
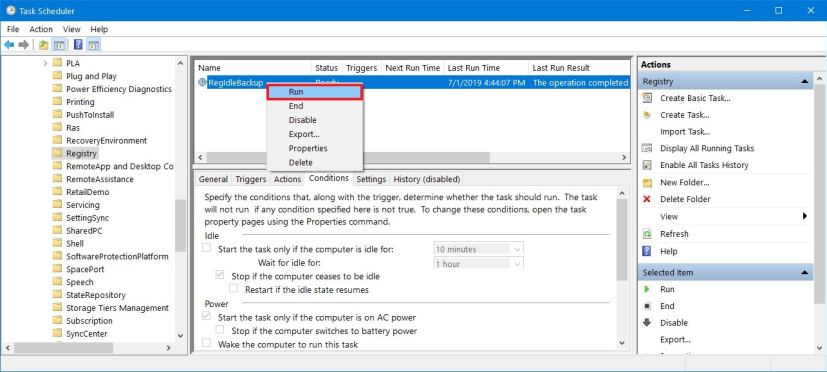
Right-click the RegIdleBackup task and select the Run option.

Running RegIdleBackup task on Windows 10
After you complete the steps, the task will run to create a backup of the entire Registry using five files (Default, Sam, Security, Software, and System), overwriting the previous backup in the RegBack folder.
