
- To free up disk space on Windows 10, open Settings > System > Storage > Temporary files, select the unnecessary files, and click “Remove files” to make more space on the “C” drive.
- In addition, you can open Settings > System > Storage > Storage Sense, select the files to delete to free up space, and click on “Run Storage Sense now.”
- It’s also possible to use the legacy Disk Cleanup tool to free up space on your computer.
- Other methods to free up space on Windows 10 include uninstalling apps you don’t use, disabling hibernation, resetting the search index, and transferring files to another drive.
On Windows 10, you can quickly free up space on your computer’s hard drive in a number of ways, and in this guide, you will learn how. When the “C” drive is full without reason, or the device starts showing signs that it’s running out of space, it’s critical to remove unnecessary files to have more room for other files and prevent performance problems. Using a computer without enough available space will slow down the system and cause errors. It’s never a good idea to use more than 70 percent of the total capacity of the hard drive, whether it is a Solid solid-state drive (SSD) or a traditional hard disk drive (HDD).
Windows 10 offers many ways to free up space when the hard drive on your device has low available space. Some of the easiest methods include using the Temporary file settings, Storage Sense, and you even use the legacy Disk Cleanup. You can also reclaim some additional space by uninstalling apps you don’t use, disabling hibernation, and resetting the search index.
This guide will teach you different easy ways to declutter the hard drive on Windows 10.
- Delete temporary files on Windows 10
- Run Storage Sense on Windows 10
- Run Disk Cleanup on Windows 10
- Uninstall apps on Windows 10
- Disable hibernation on Windows 10
- Reset search index database on Windows 10
- Transfer files to another drive on Windows 10
Delete temporary files on Windows 10
The “Temporary files” settings allow you to delete unnecessary files to run Windows 10 to quickly free up hard drive space. For example, leftover files after installing a new version, upgrade logs, error reporting, temporary Windows installation files, and many others.
To delete temporary files to free up hard drive space on Windows 10, use these steps:
-
Open Settings on Windows 10.
-
Click on System.
-
Click on Storage.
-
Click the Temporary files setting.

-
Check the temporary files to free up space on Windows 10, such as “Windows Update Cleanup,” “Recycle Bin,” “Windows upgrade log files,” “Temporary files,” and “Temporary Windows installation files.”
-
Click the Remove files button.

Once you complete the steps, the junk temporary files will be removed from your computer, freeing up space for more important files on Windows 10.
Run Storage Sense on Windows 10
“Storage Sense” is another feature that can free up space automatically whenever the “C” drive is low on space. It does this by deleting temporary system and apps files, emptying the “Recycle Bin” and “Downloads” folders, and converting files already synced to OneDrive to online-only content.
To free up space with Storage Sense on Windows 10, use these steps:
-
Open Settings.
-
Click on System.
-
Click on Storage.
-
Under the “Storage” section, click the “Configure Storage Sense or run it now” option.

-
Turn on the Storage Sense toggle switch.
-
Check the “Delete temporary files that my apps aren’t using” option.
-
Select when to run Storage Sense automatically, including “Every day,” “Every week,” “Every month,” or “During low free disk space”

-
Under the “Temporary files” section, check the “Delete temporary files that my apps aren’t using” option.
-
Choose when to delete files from the Recycle Bin using the “Delete files in my recycle bin if they have been there for over” setting. (The “Never” option disables the feature.)
-
Select when to delete files from the “Downloads” folder using the “Delete files in my Downloads folder if they have been there for over” setting.
-
Choose when the OneDrive files synced to your computer will become online-only files using the “OneDrive” setting to free up space.
-
Check the “Delete previous versions of Windows” option (if applicable).
-
Click the Remove button.
Once you complete the steps, Windows 10 will free up hard drive space, making more room to store other files. Also, since you are enabling the feature, Storage Sense will run automatically during low available drive space.
Run Disk Cleanup on Windows 10
The “Disk Cleanup” tool has been available for a long time, and it allows you to select and remove unnecessary files from your computer.
To remove temporary files on Windows 10 from Disk Cleanup, use these steps:
-
Open File Explorer.
-
Click on This PC from the left navigation pane.
-
Right-click the drive with the Windows 10 installation and select the Properties option.

-
Click the Disk Cleanup button.

-
Click the “Clean up system files” button.
-
Check the items you want to delete. For instance, “Temporary Windows Installation Files,” “Windows upgrade log files,” “Recycle Bin,” “Temporary Files,” and “System created Windows Error Reporting.”

-
Click the OK button.
-
Click the Delete Files button.
Once you complete the steps, temporary files will permanently be deleted from your computer, making room for new files.
Uninstall apps on Windows 10
Uninstalling apps from your computer can help free up disk space on your computer. Over time, you may accumulate a lot of apps you no longer use or need, and these can take up valuable storage space. By uninstalling them, you can reclaim space and improve the performance of Windows 10.
To uninstall an app on Windows 10, use these steps:
-
Open Settings.
-
Click on Apps.
-
Click on Apps & features.
-
Under the “Apps & features” section, select the app (or game).
Quick tip: If you have a lot of apps, you can use the search box, the “Sort by,” and “Filter by” options to find the app faster. -
Click the Uninstall button.

-
Click the Uninstall button again.
Quick note: If this is a classic desktop program, continue with the on-screen directions to complete the process.
After you complete the steps, the app will be removed to free up space on your computer. You can also check out this guide with many more methods to uninstall applications.
Free up storage space by eisabling hibernation on Windows 10
Hibernation is a feature that allows the computer to save its current state to the hard drive and power off completely. When the computer is turned back on, it can quickly resume from where it left off. However, this feature requires a large amount of space to store the hibernation file. When disabling hibernation, you can free up valuable space on Windows 10.
To disable hibernation on Windows 10, use these steps:
-
Open Start.
-
Search for Command Prompt, right-click the top result, and select the Run as administrator option.
-
Type the following command to disable hibernation to free up space and press Enter:
powercfg /hibernate off
Once you complete the steps, the feature will be disabled, potentially freeing up several gigabytes of disk space on your computer.
Reset search index database on Windows 10
The search index is a database that stores information about the files and folders on your device. Although it helps to show results quickly when using the Windows Search feature, it can also take up a significant amount of space over time. If you reset the search index, you can clear out any unnecessary data and start fresh with a smaller, more efficient database. This can help improve system performance and free up valuable storage space for other files and apps.
To reset the search index on Windows 10, use these steps:
-
Open Settings.
-
Click on Search.
-
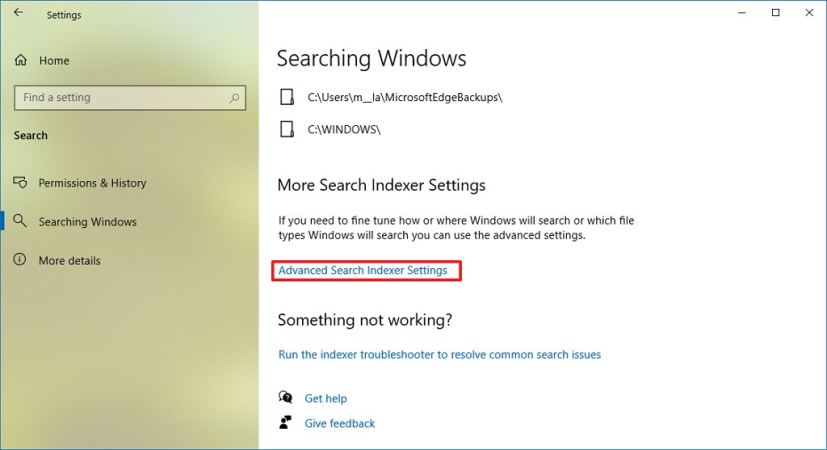
Click on Searching Windows.
-
Click the “Advances Search Indexer Settings” option.
-
Click the Advanced button.
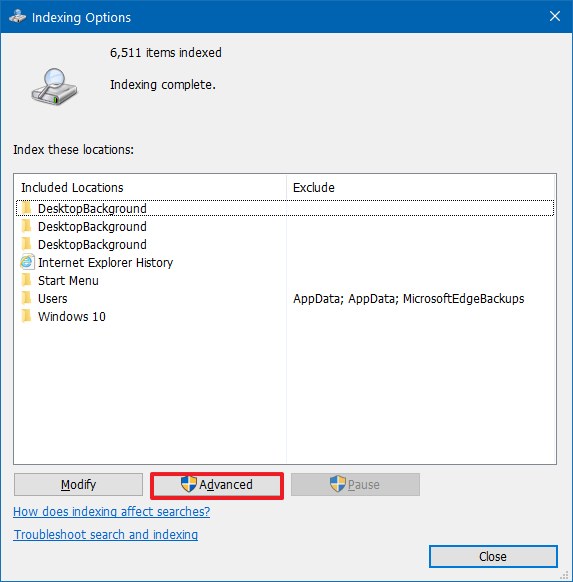
-
Under the “Troubleshooting” section, click the Rebuild button to delete the database.
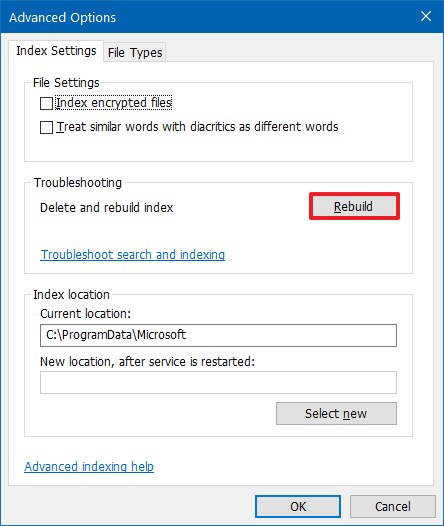
-
Click the OK button.
-
Click the Close button.
Once you complete the steps, the index database file will be deleted and replaced with a new, smaller version, freeing up some additional space on Windows 10.
Transfer files to another drive on Windows 10
Alternatively, you can connect a secondary storage using an external USB drive or internal hard drive to transfer your files to clear space in the system drive.
To free up space relocating files to another drive on Windows 10, use these steps:
-
Open File Explorer.
-
Open the folder with the files to transfer.
Quick note: Usually, you want to change the location for files that take up a lot of space, such as images, virtual machines, videos, etc. -
Select the files and click the Cut button from the command bar.

-
Open the new drive location.
-
Click the Paste button from the command bar.
Once you complete the steps, the system drive will have more space for other files. You may have to repeat the steps to transfer other files and folders. In addition to using File Explorer, you can also perform the same task faster using commands with the Robocopy tool.
If, after using these methods, the computer continues low in drive space, you may want to try resetting the system or performing a clean install of Windows 10. You can also Free up storage space by moving large files, such as videos, images, and virtual machines, to an external hard drive.
Mauro Huculak is a Windows expert and the Editor-in-Chief who started Pureinfotech in 2010 as an independent online publication. He is also been a Windows Central contributor for nearly a decade. Mauro has over 12 years of experience writing comprehensive guides and creating professional videos about Windows, software, and related technologies, including Android and Linux. Before becoming a technology writer, he was an IT administrator for seven years. In total, Mauro has over 20 years of combined experience in technology. Throughout his career, he achieved different professional certifications from Microsoft (MSCA), Cisco (CCNP), VMware (VCP), and CompTIA (A+ and Network+), and he has been recognized as a Microsoft MVP for many years. You can follow him on X (Twitter), YouTube, LinkedIn and About.me.