Windows 11 is the next major release of the desktop OS that will start rolling out to compatible devices on October 5, 2021. Since laptops and desktop computers that meet the minimum requirements will receive the new version as a free upgrade, the process will require complete reinstallation, which means that you want to be prepared to avoid errors and problems before getting started with the installation.
Although it’s recommended to install Windows 11 to access all the new features, the redesigned interface, and take advantage of the latest security improvements, the process can also lead to unwanted problems. Also, during the early days of the rollout, unexpected errors and bugs are expected, as building an operating system that will run on many hardware configurations is very challenging.
In this guide, you will learn some tips to avoid problems and errors during the installation of Windows 11.
- Check Windows 11 compatibility
- Install Windows 11 through Windows Update
- Backup current system and files
- Avoid storage problems during Windows 11 upgrade
- Repair Windows Update to download Windows 11
- Remove blocks to download Windows 11
- Uninstall non-essential apps to prevent problems
- Prevent settings problems after installing Windows 11
- Disconnect non-essential peripherals to avoid problems
- Fix Windows 11 upgrade errors
- Upgrade to Windows 11 manually
Check Windows 11 compatibility
Although Windows 11 will be offered as a free upgrade for devices already running Windows 10, not every computer will be able to upgrade because the system requirements have changed. As a result, to avoid problems, you want to make sure that your computer hardware configuration meets the minimum requirements before trying to upgrade.
These are the Windows 11 minimum hardware requirements:
- Processor: 1GHz or faster CPU or System on a Chip (SoC) with two or more cores.
- RAM: 4GB.
- Storage: 64GB (minimum).
- System firmware: UEFI, Secure Boot capable.
- TPM: Trusted Platform Module (TPM) version 2.0.
- Graphics: DirectX 12 (minimum) with WDDM 2.0 driver.
- Display resolution: High definition (720p) display larger than 9″ diagonally, 8 bits per color channel.
- Networking: Microsoft account and internet connectivity required for setup for Windows 11 Home.
As noted in the requirements, Windows 11 requires a Trusted Platform Module (TPM) version 2.0. Without it, you won’t be able to upgrade through Windows Update. You can use these steps to check and enable the module on your computer. Also, the new version needs to have Secure Boot enabled in the UEFI settings of the motherboard.
Windows 11 won’t be compatible with all processors. For instance, the new version will support Intel Core 8th Gen and higher processors, in addition to some Pentium, Atom, Celeron, and Xeon CPUs. If you are going AMD, Windows 11 will only support the second-generation Ryzen (including Threadripper) and newer processors, alongside some EPYC and Athlon CPUs. As for ARM support, the new version of Windows will support Qualcomm Snapdragon 850, 7c, 8c, 8cx first and second-generations, and the Microsoft SQ1 and SQ2.
If you have a 7th Gen Intel processor, you will probably be out of luck. However, you will be able to install Windows 11 if the device has the 7820HQ chip. Also, Intel’s Core X and Xeon W processors will be supported, but only if the device has Declarative, Componentized, Hardware Support Apps (DCH) drivers.
If the computer doesn’t meet the minimum requirements, you could still be able to upgrade, but at your own risk using the ISO file or Media Creation Tool. However, as long as the device includes a 64-bit processor with at least two cores, 4GB of RAM, 64GB of storage, and an enabled TPM 1.2 chip.
The caveat is that the installation won’t be supported, so that you won’t receive security or driver updates. There won’t be any guarantee of stability, nor will you get support from Microsoft.
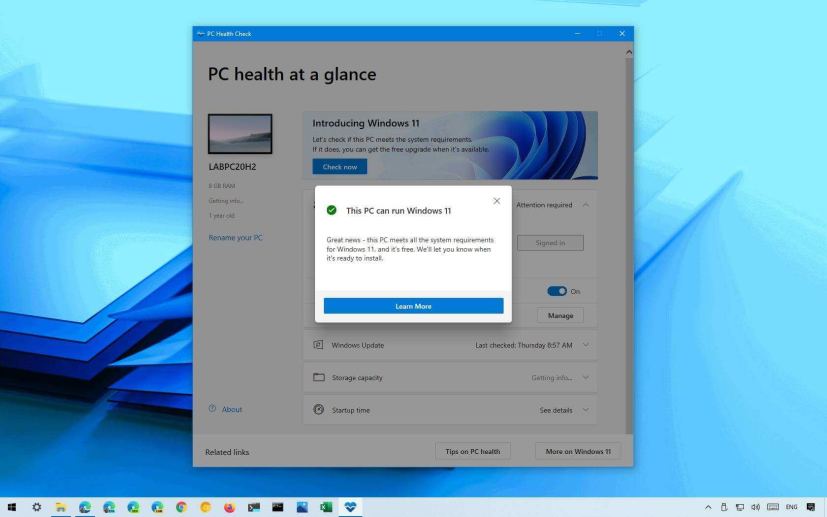
If you are not sure the computer has these required components, you can use the PC Health Check app or a third-party tool known as WhyNotWin11 to determine if the device can run Windows 11.
Install Windows 11 through Windows Update
Windows 11 offers several upgrade methods, but the preferred method is using the Windows Update to download and install the new version manually. Usually, during the early days of a release, it is not recommended to rush the upgrade because it may not still be fully compatible with your computer. This is not a secret, and it is one of the reasons Microsoft releases major updates in faces and places temporary holds on certain devices to prevent problems.
If you want to upgrade with Windows Update as soon as Windows 11 is ready, open Settings > Update & Security > Windows Update and click the Check for updates button. Under the “Upgrade to Windows 11 is ready – and it’s free” notification, click the Download and install button.

If your computer is not seeing the new version, the reason could be that it’s not yet ready for your device, or the hardware configuration does not meet the minimum requirements. You can use alternative ways to upgrade, including the “Update Assistant” or “Media Creation Tool.” However, if the update is not available through Windows Update first, you will likely run into issues.
To avoid errors and other problems, you should wait several months before upgrading unless the new version includes something you need. If you cannot wait, check out the tips below to minimize issues trying to install the new Windows experience.
Backup current system and files
Before you upgrade to Windows 11 from Windows 10, a full backup is the most important step since it can help recover files or the entire system in case of problems. You should always take the time to create a full backup before any installation to have a way to revert to a previous version if something goes wrong.
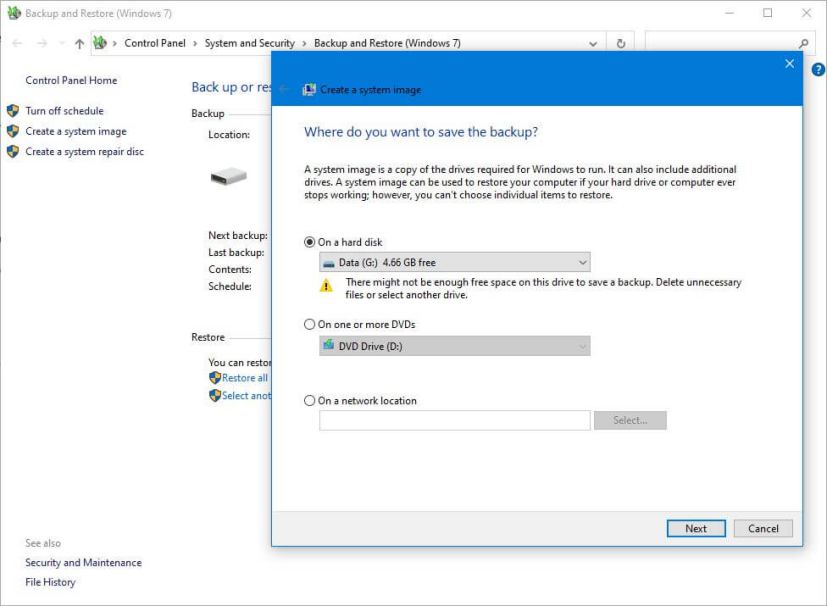
The upgrade process to a new version of Windows goes without problem, and the system has a mechanism to roll back if there is an issue during the installation. However, it is also recommended to create a backup in case something fails. At least, you should create a file backup to protect your pictures, videos, and other files.
Avoid storage problems during Windows 11 upgrade
Reserved Storage is a feature designed to set aside part of the system’s available storage in advance to process updates. However, there are still chances that you may come across storage problems trying to complete the Windows 11 upgrade, even when the feature is enabled. For instance, you may see the error message 0x80070070 – 0x50011, 0x80070070 – 0x50012, or 0x80070070 – 0x60000.
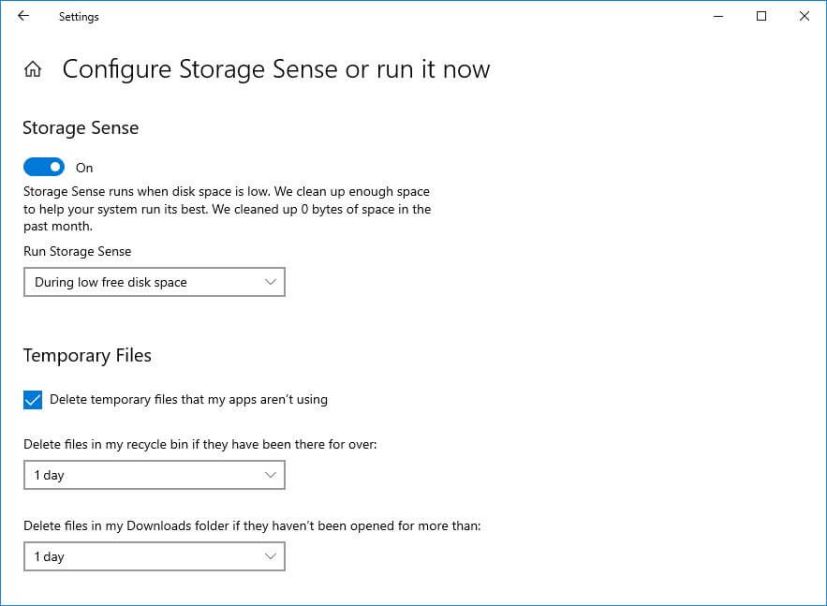
Storage issues are common on computers with limited hard drive capacity. You can avoid problems by ensuring that it has at least 64GB of available space for download and installation.
If the device does not have enough space, use the Settings app to delete temporary and other unnecessary files. You can also connect an empty USB flash drive with at least 8GB of storage space to use as temporary storage to perform the upgrade.
Repair Windows Update to download Windows 11
Although it could take some time before a device gets the Windows 11 upgrade offer automatically through Windows Update, sometimes, the update mechanism does not work as expected and can end up being why the new version is not available.
If you are dealing with Windows Update problems, you can reset the system components to resolve stuck updates trying to download. If you cannot fix the issue, the “Update Assistant” tool could be an alternative approach to installing Windows 11 after it becomes available.
Remove blocks to download Windows 11
If the computer was previously configured to defer upgrades using the Group Policy settings, then Windows 11 won’t download through Windows Update until you remove the block. You can refer to this guide to revert the changes.
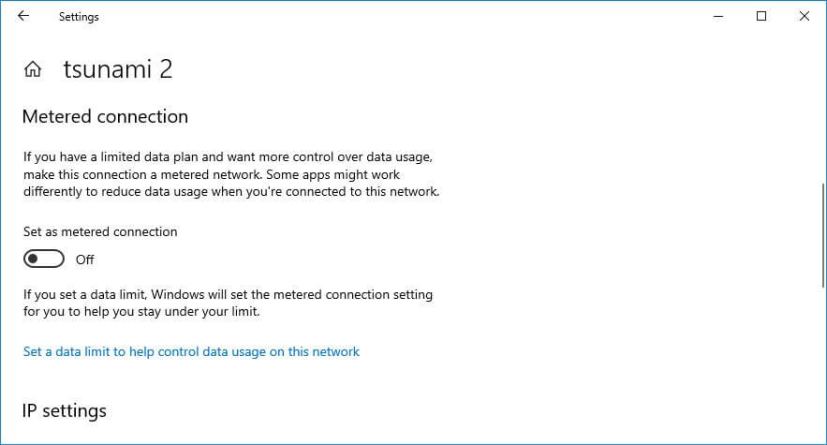
A metered connection can also block the Windows 11 update from installing. If you have a wired or wireless connection set as metered, you can remove the block from Settings > Network & Internet > Wi-Fi (or Ethernet), selecting the network and disabling the “Set as metered connection” toggle switch.
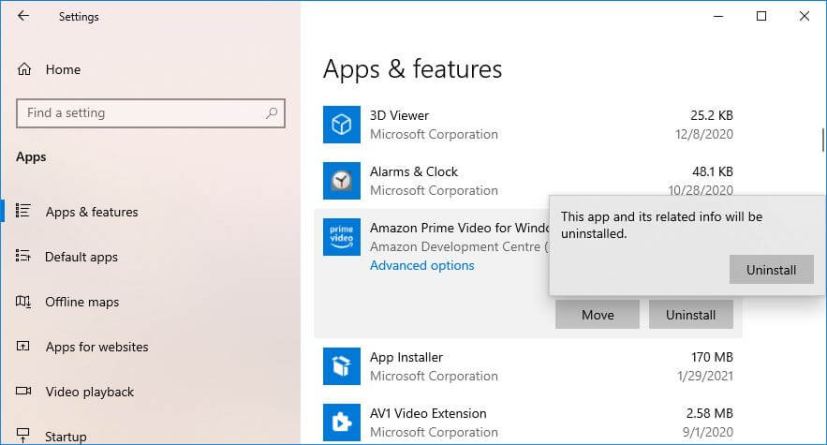
Uninstall non-essential apps to prevent problems
Usually, third-party security software can cause installation issues. If you have an antivirus (other than the Microsoft Defender Antivirus), or another type of security software, you should disable or temporarily uninstall them before upgrading to Windows 11. Applications designed for older versions of the OS can also cause problems. If you suspect an app that may cause a problem, it’s best to remove it. You can reinstall it after the installation.
You can uninstall security programs from Settings > Apps > Apps & features, select the app, click the Uninstall button, and follow the on-screen directions.
Prevent settings problems after installing Windows 11
The installation process can sometimes reset some of your previous settings, such as default apps, privacy settings, and many others. If you have specific configurations, you should note the settings before upgrading to Windows 11. If something changes during the process, you can restate them later on.
Disconnect non-essential peripherals to avoid problems
Storage devices (such as USB flash drives and external hard drives), printers, and cameras connected to the laptop or desktop computer can cause errors and other problems during the installation process. This means that it’s best to disconnect all the peripherals to avoid many problems installing Windows 11. You only need a monitor, keyboard and mouse, and a connection to the internet.
Bluetooth can also cause problems. If you have a device using this wireless technology, disable it before upgrading from Settings > Devices > Bluetooth & other devices and turning off the Bluetooth toggle switch.
Fix Windows 11 upgrade errors
If you have taken all the precautions, followed the installation steps correctly, and the device still has a problem, you are probably not the only one with the same issue. In this situation, you should research the error online to determine if other people are having the same problem and a workaround.
Microsoft will publish such information, status, and possible solutions on the Windows 11 health dashboard website when it is a known issue.
Aside from unexpected errors and bugs with Windows 11, there are a bunch of known problems (not considered bugs) that can occur during the upgrade process of any version of Windows. For instance, an error code that begins with 0xC1900101 (for example, 0xC1900101 – 0x20004, 0xC1900101 – 0x2000c, 0xC1900101 – 0x20017, 0xC1900101 – 0x30018, 0xC1900101 – 0x3000D, 0xC1900101 – 0x4000D, 0xC1900101 – 0x40017) is typically a driver error.
If you see an error 0xC1900208 – 0x4000C, it means that an app is incompatible with the upgrade. 0x80070070 – 0x50011 (0x50012 or 0x60000) is another common error, and it typically means that there is not enough space to complete the update.
Upgrade to Windows 11 manually
When the problem is your device and not the new version of Windows, the best way to minimize issues is to perform a clean installation of Windows 11, reconfigure the settings, reinstall the apps, and restore the files from backup.
Instead of a clean installation, you can also try an in-place upgrade using the Media Creation Tool to preserve your apps, settings, and files.
An in-place upgrade is a straightforward process. You only need to download the Media Creation Tool from Microsoft, launch the setup and use the Upgrade this PC now option. Then select the option to keep your files and apps and continue with the on-screen directions.
If you are not ready for Windows 11, you don’t have to do anything to block it since it’s only available as an optional update. However, if you end up upgrading, but it’s causing problems, you can always remove and roll back to the previous version.
Mauro Huculak is a Windows expert and the Editor-in-Chief who started Pureinfotech in 2010 as an independent online publication. He is also been a Windows Central contributor for nearly a decade. Mauro has over 12 years of experience writing comprehensive guides and creating professional videos about Windows, software, and related technologies, including Android and Linux. Before becoming a technology writer, he was an IT administrator for seven years. In total, Mauro has over 20 years of combined experience in technology. Throughout his career, he achieved different professional certifications from Microsoft (MSCA), Cisco (CCNP), VMware (VCP), and CompTIA (A+ and Network+), and he has been recognized as a Microsoft MVP for many years. You can follow him on X (Twitter), YouTube, LinkedIn and About.me.